Showing posts with label Recycled Projects. Show all posts

Tuesday, December 11, 2012

Cone Christmas Tree Made From Recycled Cardboard

If any of you use Pinterest, you've probably seen the super adorable cone Christmas trees all over it. I saw some last year and thought they were neat, but after looking at the cardboard cones at Hobby Lobby and seeing that they're kind of expensive for this project, I decided that if I wanted to make a cone tree, I better figure out how to make my own cone to use. Luckily I had some practice making cones (I'll post the project later) for baby bear's first birthday party hats. Being an avid recycler and tree-hugger, I have a bunch of boxboard hanging around in "limbo," waiting to be taken to the recycling center. Bam. Free cone. Here's the scoop:

What you'll need:
- Cardboard (I used a cereal box and got a 12" tree, so bigger box if you want a larger tree, smaller box for a smaller tree)
- Yarn/twine/something in the string family
- Modpodge
- Scissors
- Elmer's glue
- Paper clip/Binder clip

How to:
1. Cut open your box so it lays completely flat.

2. Cut off all of the little tab edges so you have a clean rectangle.


3. Fold two of the corners toward each other, keeping the printed side of the box to the inside and roll the rectangle into a cone. 


4. Unless you're an origami genius, you probably have a tail on the bottom of your cone like I ended up with. Cut that tail off and cut around the base of the cone so that you have an even base. 


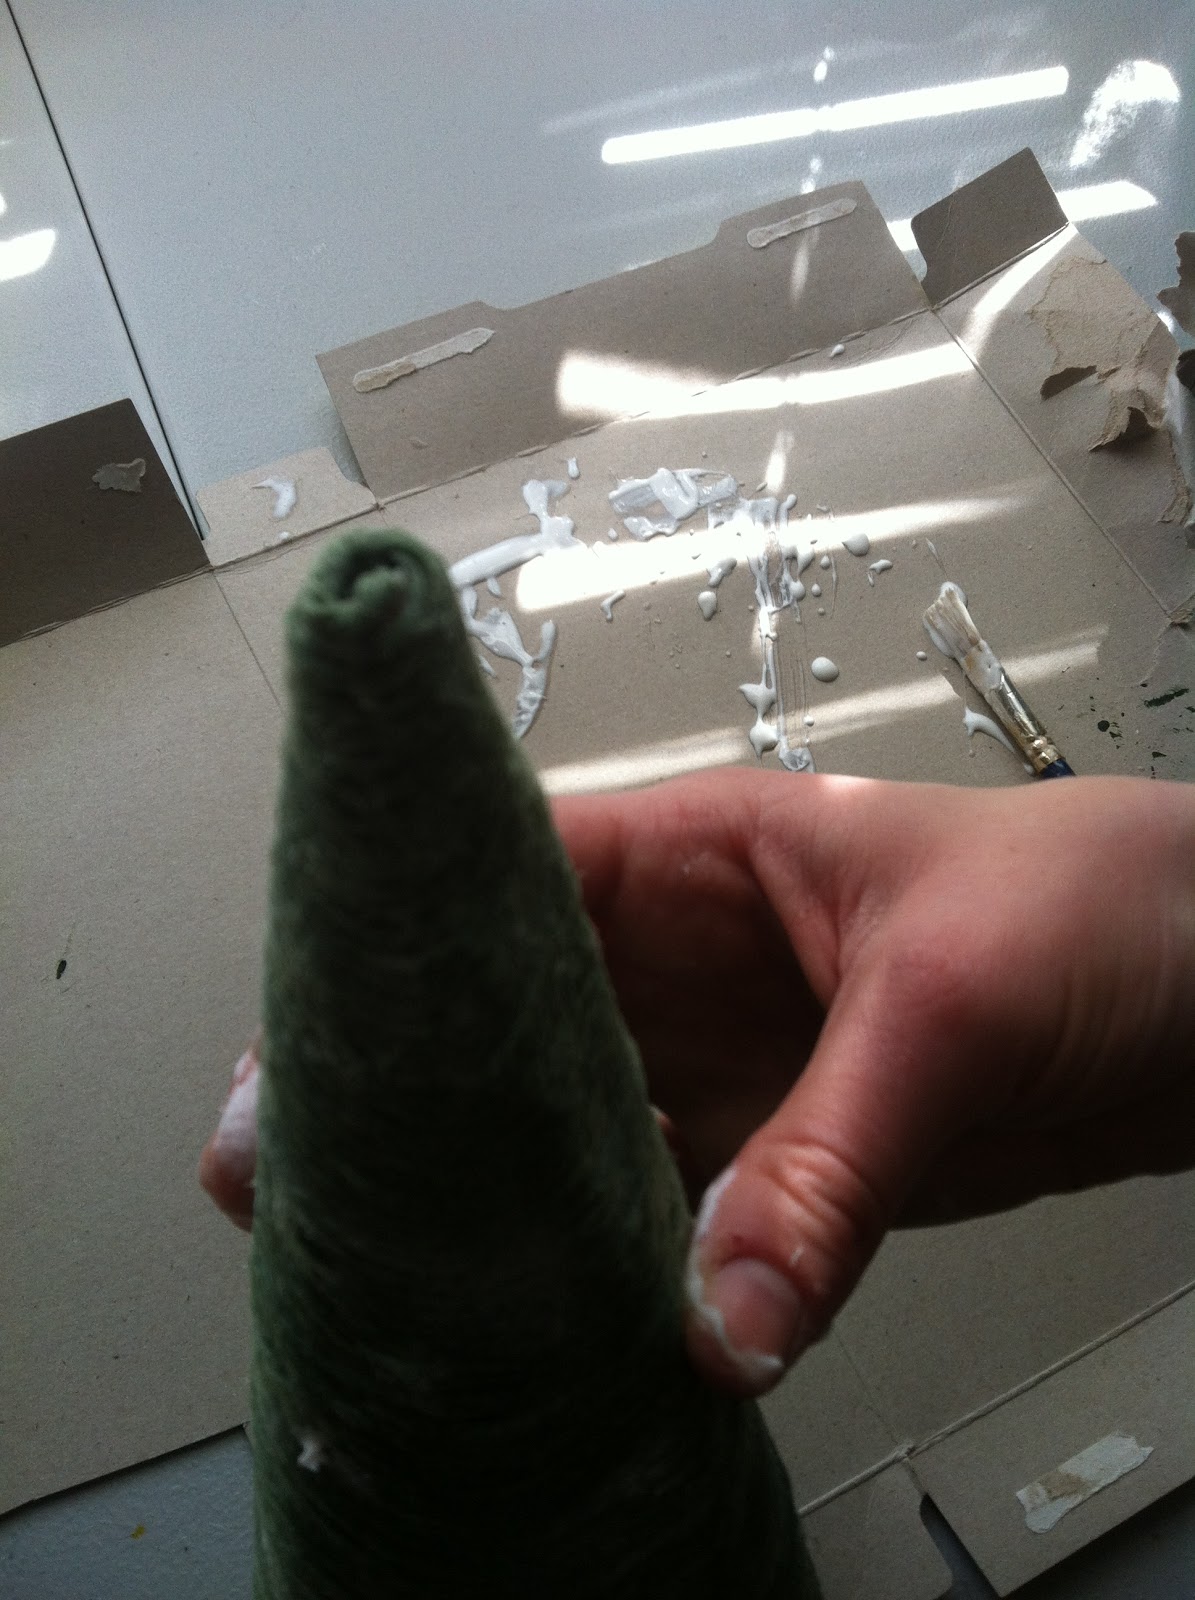
5. Using your binder clip or heavy duty paper clip, secure the cone. Spread some glue into the seam, covering the whole height of the cone, and let it dry. 


6. Spread some modpodge around the base of the cone and start wrapping your spring around, pressing it into the modpodge and making sure that the edges of the string are touching with each layer you add. Keep adding modpodge and string until the entire cone has been wrapped.

7. Cut the string from the ball/spool about 4" from where it ends on the cone to leave a tail. Put the tail through the little opening at the top.

8. You should see the tail inside of the cone, hanging like this.


9. Ta-da! Let the tree dry for a few hours and go peel the 8 extra layers of glue "skin" off of your fingers. 


I added a snowflake button to the top of mine to hide the lumpy top. Cone tree found a nice home next to my sticks in a vase with fake cranberries, our snowman candle from Holland House Candles and a snowman figurine my mom donated to the cause a few years ago. PS: whoever designed the dry bar in my house obviously was male because it's SO awkward and impossible to decorate nicely.


Sunday, April 29, 2012

T-Shirt Dog Toy

My dog is a little ball of energy and personality. Actually, I'm not even sure that he is a dog some days. He's destroyed pretty much all of his toys except for the ones that can be used to play fetch with (convenient for him, since he's a fetch robot!). I refuse to buy him more chew toys since he ruins them in the first 5 minutes of ownership, so I thought that I would give making him one from a t-shirt a try. He's been chewing on it for the last little while, so I'd call it a win.


Recycled T-shirt Dog Toy
Materials:
- Scissors
- Old t-shirt (you could use one, or a few for different colors)
- Knot tying abilities

Directions:
1. Cut the old t-shirt into 1 inch think strips. I cut mine across from side to side. You'll want to cut at least 8 strips, but more than 8 would definitely make the toy better!

2. Take one strip, make it into a loop and tie a knot in it, leaving the loop.

3. Feed another strip through the loop from step 2, then tie it in a knot to secure it. 

4. Feed the rest of the strips, one at a time, through the original loop, then tie a knot in each to secure it to the rest. It should kind of look like a ball where the knots are, with lots of tails hanging off. 

5. Tie a knot in each of the "tails." Dogs like to chew on knots, it's science. Well not really, but it will add interest to the toy. 

6. Give the toy to your dog and let it go to town chewing! 


This toy doesn't have an adorable face to rip off, but it serves it purpose. If your animal is anything like mine, this is a great alternative to a rope, which they eat the string out of and risk causing serious digestive track injuries. The best part, it's free. Who doesn't love a free dog toy?

Wednesday, April 18, 2012

Recycled T-Shirt Beach Bag

I love going to the beach. Now that we live super close to a gorgeous beach, I plan on taking advantage of the sandy goodness. I have a whole slew of bags to choose from to take to the beach, but all of them are a pain in the behind to wash and trap sand in seams and pockets. It's frustrating, so I decided that it was time for something that can be tossed in the wash with beach towels and will actually come out CLEAN. T-shirts are so versatile when it comes to reusing them, and since they are washing machine friendly, an old t-shirt was the perfect material for my super easy project. Actually, choosing which old t-shirt to use was the hardest part.


Recycled T-Shirt Beach Bag
Materials:
- Old t-shirt
- Scissors
- Something round and about 10" in diameter
- Needle and thread

Instructions:
1. Lay t-shirt out flat on a table. Cut the sleeves off, leaving the seam attached to the shirt.


2. Place the "something round" (I used a mixing bowl) over the head hole so that about 3/4 of the something round is on the shirt.  Cut around the something round. This is the opening of the bag.


3. Turn the t-shirt inside out and match up the bottom hems. Sew the bottoms together along the existing seam. If doing this by hand, you probably want to back stitch it twice, if by machine go over it twice to reinforce it. 


4. Turn the shirt right side out and your bag is done!

This bag is washable, versatile, recycled, and can increase the life of a worn out but special t-shirt! I'll probably also use this bag at the farmer's market since it is much easier to wash than my reusable grocery bags. 

Saturday, March 31, 2012

5 Ways to Reuse Containers Around Your House

It's no secret that I'm a little bit obsessive when it comes to recycling. I try to reuse as much as possible and wanted to share a few of my reuse ideas with you!


1. Grease Collector
Many people use a metal can to collect grease and throw it away after one use because it can't be sealed to keep the stink in and the bugs out. Try using a glass jar with a lid instead so it can be used until full and keep unnecessary metal out of the landfill!

2. Drawer Organizer
I learned this one from my mom. Thank you cards, Christmas cards, really any set of greeting cards or personal checks that you buy comes in a box. Those boxes are usually the perfect size to hold items in a desk drawer, junk drawer or bathroom drawer. I used Christmas card boxes and lids to organize the supply drawer in our office. This drawer is a little bit chaotic at the moment, but you get the idea.


3. Laundry Soap Drip Catcher
Since most of the world is taller than I am, everywhere we live seems to have a high shelf over the laundry area that I can barely reach. Getting the soap out is enough of a challenge, so when the extra drips, there isn't much I can do about it. My brilliant hubs came up with this idea after watching me get angry at the laundry soap puddles on the floor next to our washer. Cut the bottom section off of a water bottle, leaving about 2 inches of the body of the bottle attached. Punch two holes on opposite sides of the little cup, thread with some yarn or string and hang it over the dispenser of your detergent. Drips stay in the catcher and my floor/ironing board/mop underneath stay soap-free!


4. Compost Collector
Being the pretend avid gardeners that we are, the hubs built us a composter (post to follow) to create fertile soil to add to our crappy, sandy soil. Hopefully next spring we'll have great garden soil to use! I washed out an Oxiclean container (because it has a lid) and am using that to collect fruit and veggie scraps and coffee grounds in my kitchen. This has to get emptied every night otherwise the compost items will putrefy, but it works great! It doesn't leak, the smell is contained until it's ready to go out, and I don't have to worry about leaving rotting food scraps in one of my kitchen bowls! 

5. Baking Soda Sprinkler
As I posted before, I have been using baking soda to clean just about everything in my house. Since I buy the big box, it has become somewhat cumbersome to lug around the house and shake out the right amount. A Parmesan cheese container is the perfect solution! Baking soda is stored in a dry container and it can be sprinkled or poured, depending on the job!

Monday, March 12, 2012

Recycled Mini-Keg Planters

This project is for the beer drinkers! My husband actually came up with the idea for this and created these awesome planters, but I think he'll be ok with me sharing it.

I don't know about any of you, but we're pretty serious when it comes to drinking our favorite summer beers. Bell's Oberon, a delicious summer beer that can be described accurately as "sunshine in a bottle," is a staple in my house year round. We've gone so far as to import it by the case from Michigan when we were unable to buy it in our local area. And really, what better way to enjoy your favorite beer than from a mini-keg? (We really aren't drunks, just enjoy a good beer!) The hubs took one of our empty mini-kegs from a few years ago and cut the top off of it. He drilled a few holes in the bottom for drainage and we had a unique planter container!!

Unfortunately, I don't have step by step pictures of this project, but I do know that he used his Dremmel to cut the top of the keg off and a regular drill bit to drill the drainage holes.
Before: Empty mini-keg

Cut this top part off and drill holes in the bottom part

Finished product!


To make this project even better, Bell's changes their label design a little bit each year, so we have a few slightly different planters from over the years! Motivation to drink a summer beer? I think so.

Thursday, February 23, 2012

Keepsake Box

When we were growing up, my mom kept a box for each one of the kids to save things that were important to us. She called it our keepsake box. Looking at the items in that box as an adult is like opening up a treasure chest of my childhood. There are awards from school, pictures I drew, craft projects, little trinkets, and birthday cards in it that bring back tons of memories. I'm so glad that my mom kept all of this stuff for me and I wanted to do the same for baby bear. I actually borrowed this design idea from my sister :) All I needed for this project was a recycled copy paper box and some fabric.

Keepsake Box
Materials:
- Copy paper box with lid
- 1 1/2 yards of fabric (Baby bear picked out her lady bug print)
- Hot glue

1. Measure out the fabric to fit around the lid and bottom part of the box. Cut the fabric into two pieces.
2. Center the lid in the middle of its fabric piece, outside top facing down. Spread hot glue over the top of the lid and carefully place it onto the fabric. Spread some more glue on the long edges of the lid, pulling the fabric up the edges and smoothing it out. Spread glue on the short edges and smooth the last of the fabric onto the lid. I used the gift wrap technique to finish my edges (see picture) and give it a cleaner finish.
3. Repeat step two for the bottom of the box. Glue the extra fabric down to the inside of the box to help it hold up better against wear and tear.
4. Let the glue dry for at least an hour before you put the lid on the box!
5. Fill with memories!


Baby Bear's box is already full of baby shower cards, birth cards, newspapers and other items from the day she was born, mail that she's received from our family up north and items from her baptism. I plan on adding birthday cards, favorite little toys, pictures and projects she's made, awards and things from school and whatever else is a representation of her as she grows up. 

Tuesday, January 10, 2012

Recycled Tights Headband

As anyone with a little girl knows, hair accessories are all the rage right now. I'm no exception to this fad and am guilty of not only buying but also making lots of pieces for my four month old daughter. Since she doesn't really have any hair, I have to attach any clips to a headband. There are really nice crocheted headbands at almost any craft store and on Etsy, but I've found that they are just too wide for a little melon like Baby Bear's. There are also thin elastic headbands at the store, but we've found that those squeeze the little head. A lady at church told me that she cuts headbands for her daughter from old pairs of tights, so I thought that maybe I would give it a try. Since I don't really have any old tights laying around, I had to buy a cheap pair at Target, but an old pair would definitely work great for this project. An old t-shirt or fleece scraps would probably work great too.

Materials:
- Tights
- Scissors
- Needle and thread
- Fabric glue (yet again, using the dreaded tacky glue..)

Instructions:
1. Measure the cabeza of whoever you are making this for and double it.
2. Cut three pieces of the tights length ways down the leg to the length of the doubled head circumference.


3. Stack the three pieces and match the ends up. Sew the ends together.


4. Spread the strands out to begin braiding. 

5. Braiding:
    Take the left strand (outside piece) and pull it over top of the center piece.

     Take the right piece (outside right) and pull it over the new center piece, so it is in between the center and left pieces.

     Take the new left piece and pull it over the new center piece. Then repeat with the right side and keep doing this. 

     Keep even tension on the strands as you continue the braid down to the end. Finish off the braid at about 1 inch before the bottom.

6. Grab your needle and thread again and sew the bottom of the braid closed to make sure that it doesn't fall out. There should still be about an inch of strand pieces left loose. 
7. Make the braid into a circle, matching up both ends of strands, restacking them together. Measure the headband against the head again, and hold it together where it will be just a tad smaller than the head so that it won't fall off. Sew the ends together at this point..

8. Cut a small rectangular piece of the tights, just enough to wrap around to cover the ends. 


9. Using some fabric glue, glue the edge of the rectangular piece to the seam, adding more glue and continuing to wrap the piece until it covers the whole seam and overlaps itself a little bit.

10. Trim off the excess and you're done! 

Finished product:

Best part is, the possibilities for this are endless! Dress it up with an accessory clip, make it in different colors, add more strands for a wider or woven look, etc. 

Baby Bear's will look great with her flowers, and won't be too wide for her head!


Thursday, December 29, 2011

Rustic Coasters

As anyone who has gotten married knows, after the wedding is over, you're left with a dozen or so centerpieces. I have 30 slices of a tree trunk, vases, drop in candle holders, and about a billion pine cones. There's a website you can sell them on now, but if you're lazy like me, that doesn't sound very appealing. Instead, I decided to repurpose some of my decorations into useful things instead of filling up my parents' basement with boxes of things to store. My first project: natural coasters out of the wood slices. My hubs' grandpa cut up a log for us into slices before the wedding, about an inch and a half thick. Then we polyurethaned the top and bottom to keep them from cracking, but left the bark natural. We probably could have stopped at this step and used them as is, but the slices slid on our end tables and knowing my luck, would result in a dark colored beverage spilled all over my light colored carpet.  Luckily, I had some extra grippie kitchen cabinet and drawer liner so we cut circles in the liner and used tacky glue to affix it to the bottom of the wood slices. I let them dry over night and wa-la! Pretty much free, recycled coasters!

Top

Bottom

Perfect coffee holder!

Thursday, December 22, 2011

Recycled Map Wall Art

It's no secret that my favorite place in the world is Michigan. When I started thinking about how to decorate our sterile white walled guest room to make it a little more welcoming, I decided that I wanted to use as much recycled and repurposed materials as possible. The walls/ceiling in the room as typical for an upstairs - angled and sloped. I decided that a Michigan themed room would be fun since most of our visitors are residents of Pure Michigan. There was an old state map in my car that I cut out and mod podged onto some foam board, then cut the Great Lakes out from the foam board around it. We also had some old license plates that I hung on the wall. There's still a ton more work to be done up there, including an "East Lansing" themed wall, but here's what I've made so far:


When the room is completely done, it's going to be an awesome guest space. I guess that means you should probably come visit and see it!