Sunday, April 29, 2012

T-Shirt Dog Toy

My dog is a little ball of energy and personality. Actually, I'm not even sure that he is a dog some days. He's destroyed pretty much all of his toys except for the ones that can be used to play fetch with (convenient for him, since he's a fetch robot!). I refuse to buy him more chew toys since he ruins them in the first 5 minutes of ownership, so I thought that I would give making him one from a t-shirt a try. He's been chewing on it for the last little while, so I'd call it a win.


Recycled T-shirt Dog Toy
Materials:
- Scissors
- Old t-shirt (you could use one, or a few for different colors)
- Knot tying abilities

Directions:
1. Cut the old t-shirt into 1 inch think strips. I cut mine across from side to side. You'll want to cut at least 8 strips, but more than 8 would definitely make the toy better!

2. Take one strip, make it into a loop and tie a knot in it, leaving the loop.

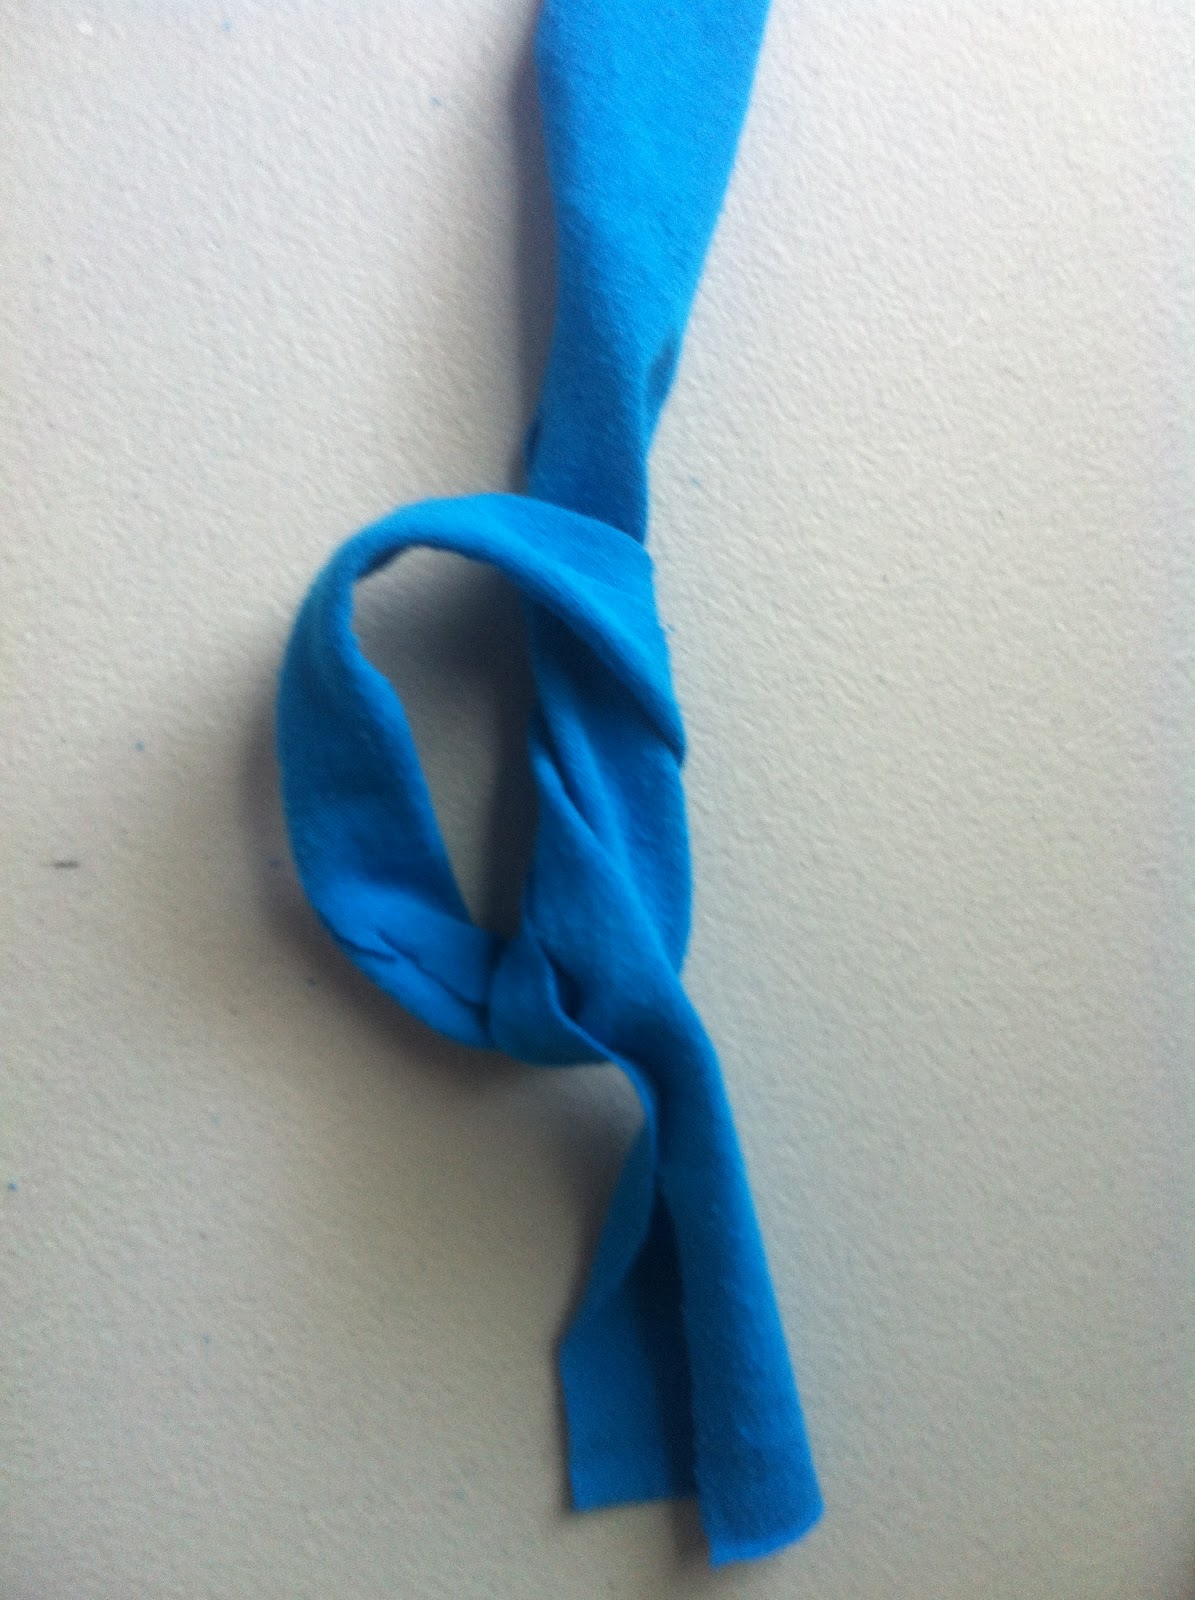
3. Feed another strip through the loop from step 2, then tie it in a knot to secure it. 

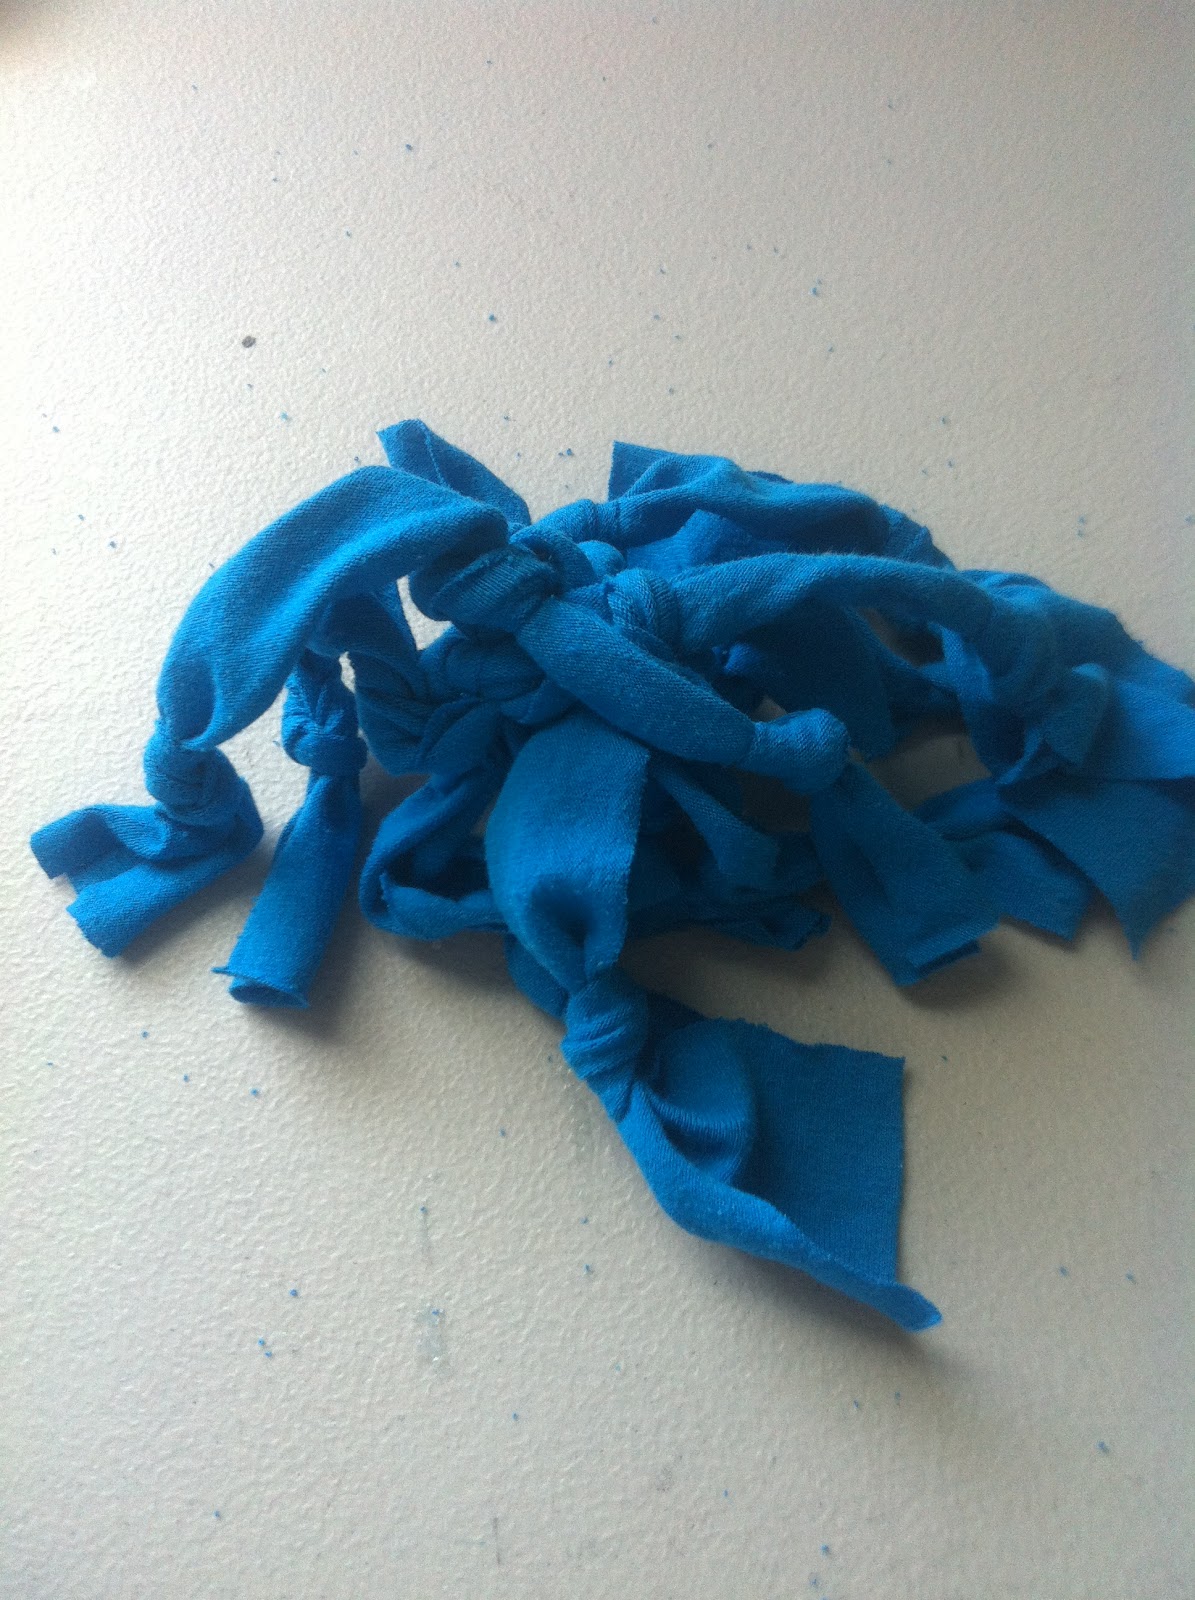
4. Feed the rest of the strips, one at a time, through the original loop, then tie a knot in each to secure it to the rest. It should kind of look like a ball where the knots are, with lots of tails hanging off. 

5. Tie a knot in each of the "tails." Dogs like to chew on knots, it's science. Well not really, but it will add interest to the toy. 

6. Give the toy to your dog and let it go to town chewing! 


This toy doesn't have an adorable face to rip off, but it serves it purpose. If your animal is anything like mine, this is a great alternative to a rope, which they eat the string out of and risk causing serious digestive track injuries. The best part, it's free. Who doesn't love a free dog toy?

Sunday, April 22, 2012

Strawberry Freezer Jam

The hubs and I took baby bear strawberry picking yesterday! We figured we'd pick a bucket full or so to freeze for the off season. Well, we picked a bucket or so.. More like two heaping buckets weighing in at 12 pounds! What in the heck do you do with 12 lbs of strawberries?!?! I cut up 25 cups of them and used our foodsaver to seal them up well for freezing. I wanted to make some jam, but I've never made it before. I found this super easy recipe and I now have 6 pints of jam to add to the freezer strawberry collection! The recipe warns several times to "follow exactly," so I did. I can't say how it tastes, since it's still in the cooling process, but it looks delicious! I will say that it's a bright pink color that you can't get from processed jams you buy at the grocery store. Happy jamming!


Strawberry Freezer Jam
Ingredients:
- 2 cups of crushed, fresh strawberries
- 4 cups of sugar
- 3/4 cup water
- 1 box of pectin (I used Sure-Jell)
- 5 1-cup containers with lids


Yield: 5 cups of Jam


1. Wash, core and cut up the strawberries. Place them into a bowl and crush them with a potato masher, one cup at a time. 
2. Stir the sugar into the strawberries and allow it to sit for 10 minutes, stirring occasionally. Meanwhile, with boiling water, wash the containers and lids, then dry thoroughly.
3. In a saucepan over high heat, mix the water and pectin. Bring to a boil while stirring continuously, then boil for one minute, stirring continuously. 
4. Stir the pectin/water into the strawberries and stir continuously for 3 minutes, or until the sugar is mostly dissolved. 
5. Allow jam to stand for 3 minutes, then pour into containers. Leave 1/2 inch between the top of the jam and the top of the container to allow for expansion in the freezer. Wipe off the edges of the containers, then put the lids on.
6. Allow the jam to cool/set for 24 hours at room temperature. Store in the fridge for up to 3 weeks or in the freezer for up to 1 year.


Wednesday, April 18, 2012

Recycled T-Shirt Beach Bag

I love going to the beach. Now that we live super close to a gorgeous beach, I plan on taking advantage of the sandy goodness. I have a whole slew of bags to choose from to take to the beach, but all of them are a pain in the behind to wash and trap sand in seams and pockets. It's frustrating, so I decided that it was time for something that can be tossed in the wash with beach towels and will actually come out CLEAN. T-shirts are so versatile when it comes to reusing them, and since they are washing machine friendly, an old t-shirt was the perfect material for my super easy project. Actually, choosing which old t-shirt to use was the hardest part.


Recycled T-Shirt Beach Bag
Materials:
- Old t-shirt
- Scissors
- Something round and about 10" in diameter
- Needle and thread

Instructions:
1. Lay t-shirt out flat on a table. Cut the sleeves off, leaving the seam attached to the shirt.


2. Place the "something round" (I used a mixing bowl) over the head hole so that about 3/4 of the something round is on the shirt.  Cut around the something round. This is the opening of the bag.


3. Turn the t-shirt inside out and match up the bottom hems. Sew the bottoms together along the existing seam. If doing this by hand, you probably want to back stitch it twice, if by machine go over it twice to reinforce it. 


4. Turn the shirt right side out and your bag is done!

This bag is washable, versatile, recycled, and can increase the life of a worn out but special t-shirt! I'll probably also use this bag at the farmer's market since it is much easier to wash than my reusable grocery bags. 

Monday, April 16, 2012

Felt Birthday Banner

Baby Bear doesn't turn one for a few more months, but I loved this project idea and wanted to get a head start on it. If you are a Pinterester, you've probably seen a bunch of bunting ideas. I really like bunting, but I don't have anywhere to put it, so this birthday banner seemed liked a great outlet for my crafting bug. I used leftover felt from the quiet book project and some leftover ribbon from hair bows. The genius hubster suggested that I put velcro on the letters so that they can be removed and I can make more letters to spell out other things if I want. There are 14 flags, so anything that is 14 letters or less can be made too!


Felt Birthday Banner
Materials:
- Felt (I used scraps that were the equivalent of about 10 full sheets of felt)
- 10 ft piece of ribbon
- Tacky glue
- Velcro
- Scissors
- Ruler
- Fabric marker
- Stop Fray (optional)


Instructions:
1. Measure and cut out triangles out of the felt that are 6 inches wide at the base and 9 inches long. I measured a straight line from the center of the base to 9 inches (the point of the triangle), marked the point, then drew the sides with the ruler. Cut out 14 of these triangles, any colors you desire.


2. Lay the triangles out in a line, points down, corners overlapping about 1/4-1/2 inch. Sew the corners of each triangle to the triangle next to it. You should have a long banner of connected triangles when you are done with this step.


3. Turn a piece of 10 ft. ribbon over so that the printed or decorated "front" side is facing down. Carefully spread about 6 inches of glue on the backside of the ribbon, then lay the first triangle base onto it, pressing down and smoothing out gently. Leave about 1/8 inch space between the base of the triangle and the edge of the ribbon at the top so that the felt won't show over the top of the ribbon. Repeat this until all of the triangles are attached to the ribbon. Let dry for at least an hour. This is also a good time to treat the ends of the ribbon with Stop Fray so that they won't fray over time. 

4. Cut 13 3" x 4" rectangles out of black felt (or whatever color you choose). Cut the letters for "Happy Birthday" out of the rectangles, one letter per rectangle. 

5. Turn the dry banner over and attach velcro to the back of the letters, then stick the letters onto the triangles to spell out the words, leaving one triangle empty in between "Happy" and "Birthday". 

6. Tie bows in the leftover ribbon ends if desired. 


Thursday, April 12, 2012

Homemade Granola Bars

My love affair with granola started in high school when I needed a quick breakfast that I could eat in the car. My mom probably should have bought stock in Quaker since she bought so many boxes of Chewy bars. This continued on through college and even as an adult, I find myself buying the huge box of Chewy bars from Costco for breakfasts. I'm not getting on the "processed food is the devil" bandwagon with this one, but I will say that the homemade version of Chewy bars are equally as delicious, easy to make (literally took five minutes while the baby was crawling around the kitchen) and are very inexpensive to make. Also, if you are an allergy sufferer like me, you can use local honey and build up your natural tolerance to the local pollen! Cheaper, probably healthier, and delicious, sounds like a win to me!

Chewy Chocolate Granola Bars
Ingredients:
1 cup of crisp rice cereal
2 cups of rolled oats
1/4 cup of honey
1/3 cup of brown sugar, packed
2 tbsp. butter (or you could use 2 tbsp of your favorite oil)
1/4 tsp. vanilla extract
1/3 cup chocolate chips (I used the minis)

Directions:
1. Grease an 8x8 pan (metal or glass)
2. In a medium bowl, combine oats, cereal and chocolate chips, mixing well
3. In a saucepan over medium high heat, melt brown sugar, butter and honey together, stirring very often. Reduce heat to medium after it becomes bubbly and stir constantly for one minute. Remove from heat and stir in vanilla extract
4. Slowly add the contents of the saucepan to the oat mixture, stirring very well until all of the oat mixture is well coated and it sticks together.
5. Spread mixture into the pan, smoothing out the top with a spoon or spatula.
6. Let cool for an hour before cutting. Cut into bars and store in an air-tight container for up to 7 days.


If you are granola obsessed as I am becoming, check out this website for a ton of yummy recipes: http://foodgawker.com/?s=granola+bars 

Tuesday, April 10, 2012

A Few of My Favorite Things

I apologize for my brief hiatus from posting as the family and I were visiting our second family for the holiday. Needless to say, my project time has been very minimal for the last week so I figured I would find something else to post about. In my earlier years, I was an avid Oprah watcher (no judgment please) and I used to love her yearly 'favorite things' show. So, in honor of Earth Day coming up and my lack of project material, I'm going to share some of my favorite environmentally friendly products with you! Most of these are baby related since most of our recent purchases (i.e., the last year of my life) have been baby related. Enjoy and feel free to comment or ask me any questions about these 'favorite things'!

Favorite Little Green Things
Life Factory glass bottles - perfect for a water bottle, or as we are using, a sippy cup for a little one! And very durable! They come in lots of colors, different sizes and with different lid options (flip-top, sippy cup, flat top and baby bottle) http://www.lifefactory.com/

Green Toys - We scored some recycled milk carton, BPA free feeding spoons for our baby bear, but they have tons of choices for feeding and toys! In addition to being eco-friendly, they are made in the USA! http://greentoys.com/index.html


Seventh Generation and Method cleaning products - Before I switched to the old fashioned vinegar and baking soda cleaning methods, I was obsessed with Method and Seventh Gen products (still am!). I still use 7th Gen dish soap and Method hand soap, but all of their products seem to work very well. http://methodhome.com/


Vulli Toys - If you have a baby or even a niece or nephew that's an infant, these teething rings rock!! They are made from natural rubber, 100% BPA and phosphate free! Baby bear loves hers! http://www.sophiegiraffeusa.com/index.html


Camelbak Groove - This is the best water bottle I have ever owned. It has a built in filter and a straw, what could be better? The bottles are BPA free and the replacement filters are very affordable. If you don't already own a reusable water bottle, you should definitely make this yours! http://www.camelbak.com/


Tuesday, April 3, 2012

Tips for Sustainable Living - Recycling Made Easy

It's official - I've been bit by the spring cleaning bug. Between the baby being mobile and needing to rearrange to make our home safer for her and everyday living, I have a list that will probably take me a few weeks to get through. As I clean out, I try to make sure that I am recycling as much as possible, whether that means taking it to the recycling center or reusing it in my home for another purpose. I have a pretty simple, yet effective system in my home that makes it easy for the hubs, myself and even our guests to recycle.

Stage 1: Collection Containers
I found these simple recycling bags at Ikea a few years ago (still available, even online!) that snap together to form a 3-section unit or can be used independently. In order to make it easy for everyone to see that we recycle and know where to put said recyclables, I have placed one of these bags next to the garbage can in my kitchen. There is also one in our office and another in the laundry room that is specifically meant to hold plastic and paper shopping bags.

Here's the bag in my kitchen:


Office:

These bags work great for inside collection! Any container would work, just make sure to clearly designate it as the recycling container. Placing recycling next to frequently used trash cans will increase how much you recycle in your home. Places like the kitchen, office and garage are great candidates for a recycling center!

Stage 2: Outdoor Holding Container
In addition to indoor containers to collect recyclables, we also have a can outside that we put anything that held food in. I rinse the containers out very well so I have never found a bug in my recycling can. We use a regular trash can with a lid to hold our recyclables, since we have to take them ourselves to the local collection site. To make things even easier and greener, I use an old mesh laundry bag from college instead of a trash bag to line the can. When I head over to the recycling center, all I have to do is pull the bag out of the can and dump the items into the big bins. The bag is washable and is saving plastic from garbage bags!  


I actively try to recycle as much as possible. I'm proud to say that my household generates only one bag of trash per week. We also compost our produce scraps, cutting down the stink inside our trash can and allowing us to use only one trash bag per week. It was a pretty easy commitment to make and keep up with. Once you start, the recycling habit will come very easily! 

"Unless someone like you cares a whole awful lot, nothing's going to get better. It's not." 
- Dr. Seuss