Saturday, March 31, 2012

5 Ways to Reuse Containers Around Your House

It's no secret that I'm a little bit obsessive when it comes to recycling. I try to reuse as much as possible and wanted to share a few of my reuse ideas with you!


1. Grease Collector
Many people use a metal can to collect grease and throw it away after one use because it can't be sealed to keep the stink in and the bugs out. Try using a glass jar with a lid instead so it can be used until full and keep unnecessary metal out of the landfill!

2. Drawer Organizer
I learned this one from my mom. Thank you cards, Christmas cards, really any set of greeting cards or personal checks that you buy comes in a box. Those boxes are usually the perfect size to hold items in a desk drawer, junk drawer or bathroom drawer. I used Christmas card boxes and lids to organize the supply drawer in our office. This drawer is a little bit chaotic at the moment, but you get the idea.


3. Laundry Soap Drip Catcher
Since most of the world is taller than I am, everywhere we live seems to have a high shelf over the laundry area that I can barely reach. Getting the soap out is enough of a challenge, so when the extra drips, there isn't much I can do about it. My brilliant hubs came up with this idea after watching me get angry at the laundry soap puddles on the floor next to our washer. Cut the bottom section off of a water bottle, leaving about 2 inches of the body of the bottle attached. Punch two holes on opposite sides of the little cup, thread with some yarn or string and hang it over the dispenser of your detergent. Drips stay in the catcher and my floor/ironing board/mop underneath stay soap-free!


4. Compost Collector
Being the pretend avid gardeners that we are, the hubs built us a composter (post to follow) to create fertile soil to add to our crappy, sandy soil. Hopefully next spring we'll have great garden soil to use! I washed out an Oxiclean container (because it has a lid) and am using that to collect fruit and veggie scraps and coffee grounds in my kitchen. This has to get emptied every night otherwise the compost items will putrefy, but it works great! It doesn't leak, the smell is contained until it's ready to go out, and I don't have to worry about leaving rotting food scraps in one of my kitchen bowls! 

5. Baking Soda Sprinkler
As I posted before, I have been using baking soda to clean just about everything in my house. Since I buy the big box, it has become somewhat cumbersome to lug around the house and shake out the right amount. A Parmesan cheese container is the perfect solution! Baking soda is stored in a dry container and it can be sprinkled or poured, depending on the job!

Monday, March 26, 2012

Whimsical Jellyfish Softies

Pinterest strikes again... I saw this idea on Pinterest, but it is absolutely perfect for my baby bear! We have turned our formal dining room into a playroom with the idea that this space is a safe and inviting place for the baby to crawl around and explore. I've been struggling to come up with ideas of how to decorate the space and make it a more friendly area. Baby bear loves sea creatures, so this project seemed like the perfect solution!


Jellyfish Softies
Materials:
- Fabric Scraps (or if you are like me and don't have a stash, fat quarters work great!)
- Ric Rac
-Ribbon (at least 3 different types),  30 inches each piece
- Needle and thread or sewing machine
- Stuffing
- Something circular to use as a patter, about 5-6 inches in diameter, depending on what size you want to make


How To:
1. Trace two circles onto a piece of fabric and cut them out.


2. Cut a piece of ric rac about 24 inches long and find the middle.
3. Using the front side of the fabric, find the middle of the circle and sew the ric rac on from it's middle to the middle of the fabric circle.
4. Cut 2-3 pieces of ribbon to about 30 inches, find the middle of each piece, then sew onto the fabric circle in the same place as the ric rac.


5. Place the ribbon adorned fabric circle ribbon side up on a flat surface. Place the other fabric circle printed/front side down on top of the ribbon, matching up the edges. Gather the ribbon ends to one side and pin the fabric together, leaving an opening for the ribbon to stick out.


6. Sew the fabric circles together along the edges. If you are doing this by hand, be sure to back stitch and use small stitches!
7. Sew around the circles, until you are to the ribbon. Turn the fabric inside out by putting all of the fabric through the hole with the ribbons. The printed side of both pieces of fabric should be showing after you do this, and the ribbons should be hanging freely from the bottom of the pouch.


8. Place stuffing into the pouch, stuffing it full so it is a nice hamburger shape.


9. Sew the open area of the pouch shut.


10. Cut another piece of ribbon to desired length for a hanger, if necessary. Sew this piece of ribbon onto the middle of the top of the jellyfish.


Easy enough? I plan on making a few more of these so Baby Bear has a whole school of jellies to look at :)

Friday, March 23, 2012

Easter Headband

This last month has been absolutely crazy. Between my best friend visiting on her spring break from law school for a week, my husband being gone for two weeks for work, and being sick (stupid allergies!), I've hardly had any time to craft. I have a list of projects I want to do that literally covers an entire wipe off board, and hopefully life will slow down a little bit to help me get to some of them! 

With Easter coming up and living so far away from our family, we decided to go spend the holiday with our second "family" at our church at our last duty station. The people at that church welcomed us in with open arms and treated us as if we were their own kids. They even threw us a huge baby shower and fed us when the hurricane knocked out power out right after our daughter was born last summer. They always referred to us as "the kids," and even though they all have kids of their own, they let us be part of their families. I can't even begin to tell you how much these people mean to us or how blessed we feel to have been loved by these people. So needless to say, even though we're going to have a full day of driving, we're heading "home" for Easter. 

Easter has always been a "special dress" occasion for me. I remember having a special dress to wear as a kid each year and I still find myself buying a new outfit to wear to church every year even as an adult. It was very important to me that the baby has a special outfit because of this. Her dress is white and has pink, purple, blue and yellow flowers embroidered along the bottom hem. It's SO cute, I can't wait to put her in it! Since she still hasn't grown much more hair, I figured that she needs a special headband to match her pretty dress. Thank you to some inspiration from Pinterest and a ton of left over felt from her quiet book adventure, we now have this:


Felt Flower Head Band DIY:
Materials:
- elastic headband (you can make your own out of tights or a t-shirt, or buy one - this one is Goody brand from Target for little girls)
- felt pieces
- needle and thread
- hot glue or fabric glue
- 3 felt balls

Instructions:
1. Cut four tear drop shapes out of each color of felt, about an inch long
2. Arrange the four tear drops of the same color into a flower, then glue or sew the pieces together (I glued mine)
3. Cut a felt ball in half and glue the flat side down to the center of the flower. 
4. Repeat 2 and 3 for all three colors
5. After the glue has dried (or right away if you went the sewing route), decide how you will arrange the flowers on the headband, then sew them on, one at a time, taking care to go through all four layers of felt and the felt ball to ensure that it stays together and stays on the headband. 

Customize: You could add leaves or more flowers, or probably use a button instead of a felt ball!

I apologize for not taking step by step photos, as I was more worried about getting the project done before nap time was over! That is a sacred and rare event lately at my house!

Happy Easter!


Quiet Book - FINISHED!!

Well, it only took me about 3 months of working on Baby Bear's quiet book whenever I could get a few minutes, but it's DONE! Finally!! I ended up binding the pages together using some quilting thread and sewing through all of the pages in the margin, then through a piece of pellon that I placed inside of the cover. Sewing through the pellon piece will hold the pages in place and gives the book the stability that a hard cover book has.

For the cover, I used flannel. I figured that flannel is soft to the touch, yet strong enough to stand up to some use. I also sewed a pocket on the back cover and an "A" initial on the front cover out of some leftover fabric I had from Baby Bear's nursery projects. For the closure, I sewed a button onto the front cover and sewed together two long pieces of the flannel, attaching them to the back cover and adding a button hole. I ran a seam all of the way around the cover and stuffed it with a very thin layer of organic cotton stuffing to give the cover some body. I still need to get some no-fray to put on the covers so the edges don't look like a hot mess, but of course I forgot to grab it in what was a disaster of a trip to the craft store this morning, so it will have to wait until next time I go.

Take a tour of Baby Bear's quiet book!!

Cover

Dress-up Page

Winter and Spring Pages

Summer and Fall Pages


Shapes Puzzle and Lacing/Tying Page


Doggy/Buckle and Clock Pages

Name Page
Back Cover

For details on how each page was made, please visit my other "quiet book" posts. If you have any questions or comments regarding this project, please feel free to leave them in the comments section below! 
I'll try my best to answer them!

Monday, March 12, 2012

Recycled Mini-Keg Planters

This project is for the beer drinkers! My husband actually came up with the idea for this and created these awesome planters, but I think he'll be ok with me sharing it.

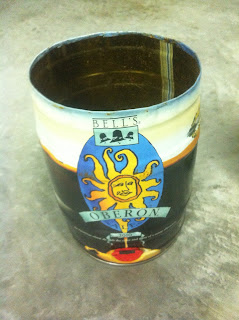
I don't know about any of you, but we're pretty serious when it comes to drinking our favorite summer beers. Bell's Oberon, a delicious summer beer that can be described accurately as "sunshine in a bottle," is a staple in my house year round. We've gone so far as to import it by the case from Michigan when we were unable to buy it in our local area. And really, what better way to enjoy your favorite beer than from a mini-keg? (We really aren't drunks, just enjoy a good beer!) The hubs took one of our empty mini-kegs from a few years ago and cut the top off of it. He drilled a few holes in the bottom for drainage and we had a unique planter container!!

Unfortunately, I don't have step by step pictures of this project, but I do know that he used his Dremmel to cut the top of the keg off and a regular drill bit to drill the drainage holes.
Before: Empty mini-keg

Cut this top part off and drill holes in the bottom part

Finished product!


To make this project even better, Bell's changes their label design a little bit each year, so we have a few slightly different planters from over the years! Motivation to drink a summer beer? I think so.

Thursday, March 1, 2012

Tips for Sustainable Living - Baking Soda

Go ask your grandmother what she used to clean her house with before all of the commercial cleaners that we have today were available. I'll bet she'll say baking soda, among other products. I saw a pin on Pinterest that showed an oven door pre- and post-baking soda cleaning. By George, baking soda actually took the gunk off! Here's the deal, the cleaners that you find on a grocery store shelf are there because we are, as a society, extremely lazy. Harsh chemicals take the "work" out of cleaning, reducing the need for putting some extra elbow grease into cleaning. So, if you decide to use baking soda or vinegar as cleaning products, be aware that it will take some extra work on your part to yield the same results. But hey, some good hard scrubbing might be beneficial to you too by burning some extra calories! Good for the environment, good for the wallet, good for your body!

I've recently started using baking soda in my cleaning tasks. Combined with a little bit of vinegar (a la elementary school science fair volcano style) it can be very powerful. Just ask my mildewy shower door track. Add a little bit of water to some baking soda to make a paste and you have a powerful scrub! Here are some ideas of where you can use baking soda in your home:


- Clean the inside of your dirty oven. Create a baking soda paste and SCRUB. I tried this in my oven after an unfortunate lasagna explosion last month left me choking on an aerosol oven cleaner. I didn't want to suffocate, so I tossed the can aside and made a baking soda paste. It took some serious scrubbing, but my oven was baked on tomato sauce free!
- Dinner stuck to your pots and pans while it was cooking but you don't want to scratch your pans trying to remove the stuck on food? Baking soda paste and SCRUB. Pretty sure this trick has saved me from being banned from using our new pots and pans!
- Dog peed on the carpet? Drop some baking soda on it with a little bit of water, scrub it and let it dry. Drop some dry baking soda on the spot, let it sit for a few hours then vacuum it up. No stain, no pee smell. it's a win for everyone.
- Ceramic oven top with charred on food/liquids? This is a daily occurrence in my house. Baking soda paste and scrub. Works like a charm.
- Husband's shoes or work clothes stinking up your closet? Open up a small box of baking soda and stick it in a corner of the closet. It will absorb the bad smell. This works for fridges too. Heck, it works pretty much everywhere.
- Dirty toilet bowl. Drop baking soda on the edges, scrub with toilet brush. Flush. Done.
- Bathroom or kitchen counter has stuck on nastiness? Baking soda paste and scrub.
- Bee sting? Remove the stinger first (if it's in there), and assuming that the stingee isn't allergic to bees and doesn't need to go to the ER, make a baking soda paste and apply it to the sting. Let it dry completely, then wash it off gently under running water. It takes the sting away from the skin and makes your 7 year old summer camp kids stop crying.

There are SO many uses for baking soda other than baking, and since it's very inexpensive AND completely non-toxic, it's kind of a no brainer. Do yourself and the environment a favor and use some baking soda to do the job.