Showing posts with label Reuse. Show all posts

Thursday, July 28, 2016

Tiny's Quiet Book

It's been a few years since I've updated this blog. Moves, another baby, lots and lots of house renovations... I finally have found some time to do projects again (woohoo!) so hopefully there will be many more updates soon.

Our oldest daughter LOVED her quiet book that I made her for her first birthday, so it seemed appropriate to make little girl #2 a book of her very own for Christmas last year. I didn't take pictures of it when I finished it, so the pictures below are of her quiet book with lots of loving.

I opted to use a grommet and binder ring binding for this one as it was all very tactile and too thick to sew the pages together on my machine as I have done in the past. It wasn't what I wanted, but has worked out fine.

This is her name puzzle/tying page. The letters all have velcro so she can move them around and learn how to spell her name. The ribbon on the shoe is able to be tied and untied and the flowers on the shoe stick off the page so she can feel them. Tiny LOVES anything tactile.
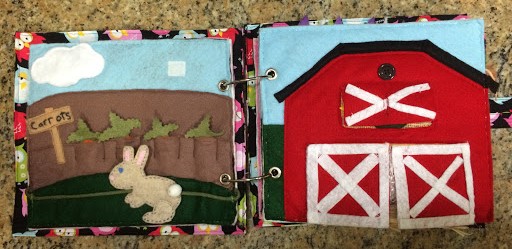
This is the "farm" page spread. The bunny moves along the string (actually it's 550 paracord) and the barn opens at the doors and hayloft. 

The carrots pull up out of the soil, but are attached to the page by a string. The cloud hides rain drops that pull down to "water" the carrots. There was a sunshine on the naked piece of velcro, but I have no idea where it disappeared to. The bunny has a pompom for a tail, so it's soft, and it "hops".

Open the barn doors and pet the sheep! I used some left over fake fur fabric from another project for the sheep and raffia for the "hay". The rooster has yarn for his head plume feathers and is hanging out on top of a burlap nest. The hayloft door swings up and buttons to stay open and teach Tiny how to button. 

Oh the monkey. Tiny loves monkeys, so of course one had to make it into her book. The leaves are all felt and only sewn onto the page at the top so she can feel them. The bananas have velcro on the stems and attach to a hidden piece of velcro under the leaves. My leaves are not even kind of close to banana tree leaves, but oh well. It works. 

The monkey's mouth "opens" and can eat the bananas. And of course, our monkey has a hair bow. 

This is the dress up page. It's pretty basic. 

Shape puzzle and pollinator pages.

The puzzle pieces are stored in this zippered compartment. They all have velcro on the back to stick on.

Bzzzzzzz. The bumble bee is made of pony beads and attached to a string at the beehive. The bee can be laced through the metal rings on each flower. The flowers are different layers of felt and a felted wool ball cut in half to give them texture. I sewed a few butterfly beads on as well and of course there is a removable (and not lost) sunshine to play with. 

Clock and Ice Cream Parlor.

The clock is literally the same design as I used for my older daughter's book. I embroidered the numbers. The hands move around the button, but do not come off. 

I scream, you scream, we all scream for...ICE CREAM! There are 6 different ice cream scoops with velcro on the back to pile onto the cone, whipped cream and a cherry to top it with, of course! All of the toppings store in the "ice cream" bag. The bunting was just a fun touch to make it look more like a party page because, well, ice cream!

Last, but certainly not least, the buckle skill page. AKA the Boston Terrier page. 

As I did with my older daughter's, this is actually one of my dog's old collars. Yes, that's a Detroit Tigers dog collar. I attached that to the page so Tiny can practice buckling. There's a treat and a tennis ball to give to our doggy as well. If you look back through my posts and see the original design of this page, you'll notice that this version has a much rounder face. Such is life when you are an aging Boston Terrier. 

All of the pages are 8 inches by 9 inches and are made on a felt backing. I cut a piece of interfacing to go in between the felt pages that had to go back to back and sewed them together with invisible thread. I had to do this part by hand. The pages each have 2 grommets for binding. I love that I could add to this one day since the binder rings open easily. Maybe one day.

Well, I hope you enjoyed my crappy iPhone pictures and lack of tutorials about how to recreate these pages. I wish I would have taken pictures as I made it, but I didn't even occur to me that I might one day resurrect this blog. As always, I tried to reuse and use as much of the fabric and felt stash as possible to make this. 

Stay tuned for more awesome projects and ideas! 

Tiny's Quiet Book

It's been a few years since I've updated this blog. Moves, another baby, lots and lots of house renovations... I finally have found some time to do projects again (woohoo!) so hopefully there will be many more updates soon.

Our oldest daughter LOVED her quiet book that I made her for her first birthday, so it seemed appropriate to make little girl #2 a book of her very own for Christmas last year. I didn't take pictures of it when I finished it, so the pictures below are of her quiet book with lots of loving.

I opted to use a grommet and binder ring binding for this one as it was all very tactile and too thick to sew the pages together on my machine as I have done in the past. It wasn't what I wanted, but has worked out fine.

This is her name puzzle/tying page. The letters all have velcro so she can move them around and learn how to spell her name. The ribbon on the shoe is able to be tied and untied and the flowers on the shoe stick off the page so she can feel them. Tiny LOVES anything tactile.

This is the "farm" page spread. The bunny moves along the string (actually it's 550 paracord) and the barn opens at the doors and hayloft. 

The carrots pull up out of the soil, but are attached to the page by a string. The cloud hides rain drops that pull down to "water" the carrots. There was a sunshine on the naked piece of velcro, but I have no idea where it disappeared to. The bunny has a pompom for a tail, so it's soft, and it "hops".

Open the barn doors and pet the sheep! I used some left over fake fur fabric from another project for the sheep and raffia for the "hay". The rooster has yarn for his head plume feathers and is hanging out on top of a burlap nest. The hayloft door swings up and buttons to stay open and teach Tiny how to button. 

Oh the monkey. Tiny loves monkeys, so of course one had to make it into her book. The leaves are all felt and only sewn onto the page at the top so she can feel them. The bananas have velcro on the stems and attach to a hidden piece of velcro under the leaves. My leaves are not even kind of close to banana tree leaves, but oh well. It works. 

The monkey's mouth "opens" and can eat the bananas. And of course, our monkey has a hair bow. 

This is the dress up page. It's pretty basic. 

Shape puzzle and pollinator pages.

The puzzle pieces are stored in this zippered compartment. They all have velcro on the back to stick on.

Bzzzzzzz. The bumble bee is made of pony beads and attached to a string at the beehive. The bee can be laced through the metal rings on each flower. The flowers are different layers of felt and a felted wool ball cut in half to give them texture. I sewed a few butterfly beads on as well and of course there is a removable (and not lost) sunshine to play with. 

Clock and Ice Cream Parlor.

The clock is literally the same design as I used for my older daughter's book. I embroidered the numbers. The hands move around the button, but do not come off. 

I scream, you scream, we all scream for...ICE CREAM! There are 6 different ice cream scoops with velcro on the back to pile onto the cone, whipped cream and a cherry to top it with, of course! All of the toppings store in the "ice cream" bag. The bunting was just a fun touch to make it look more like a party page because, well, ice cream!

Last, but certainly not least, the buckle skill page. AKA the Boston Terrier page. 

As I did with my older daughter's, this is actually one of my dog's old collars. Yes, that's a Detroit Tigers dog collar. I attached that to the page so Tiny can practice buckling. There's a treat and a tennis ball to give to our doggy as well. If you look back through my posts and see the original design of this page, you'll notice that this version has a much rounder face. Such is life when you are an aging Boston Terrier. 

All of the pages are 8 inches by 9 inches and are made on a felt backing. I cut a piece of interfacing to go in between the felt pages that had to go back to back and sewed them together with invisible thread. I had to do this part by hand. The pages each have 2 grommets for binding. I love that I could add to this one day since the binder rings open easily. Maybe one day.

Well, I hope you enjoyed my crappy iPhone pictures and lack of tutorials about how to recreate these pages. I wish I would have taken pictures as I made it, but I didn't even occur to me that I might one day resurrect this blog. As always, I tried to reuse and use as much of the fabric and felt stash as possible to make this. 

Stay tuned for more awesome projects and ideas! 

Tuesday, December 11, 2012

Cone Christmas Tree Made From Recycled Cardboard

If any of you use Pinterest, you've probably seen the super adorable cone Christmas trees all over it. I saw some last year and thought they were neat, but after looking at the cardboard cones at Hobby Lobby and seeing that they're kind of expensive for this project, I decided that if I wanted to make a cone tree, I better figure out how to make my own cone to use. Luckily I had some practice making cones (I'll post the project later) for baby bear's first birthday party hats. Being an avid recycler and tree-hugger, I have a bunch of boxboard hanging around in "limbo," waiting to be taken to the recycling center. Bam. Free cone. Here's the scoop:

What you'll need:
- Cardboard (I used a cereal box and got a 12" tree, so bigger box if you want a larger tree, smaller box for a smaller tree)
- Yarn/twine/something in the string family
- Modpodge
- Scissors
- Elmer's glue
- Paper clip/Binder clip

How to:
1. Cut open your box so it lays completely flat.

2. Cut off all of the little tab edges so you have a clean rectangle.


3. Fold two of the corners toward each other, keeping the printed side of the box to the inside and roll the rectangle into a cone. 


4. Unless you're an origami genius, you probably have a tail on the bottom of your cone like I ended up with. Cut that tail off and cut around the base of the cone so that you have an even base. 


5. Using your binder clip or heavy duty paper clip, secure the cone. Spread some glue into the seam, covering the whole height of the cone, and let it dry. 


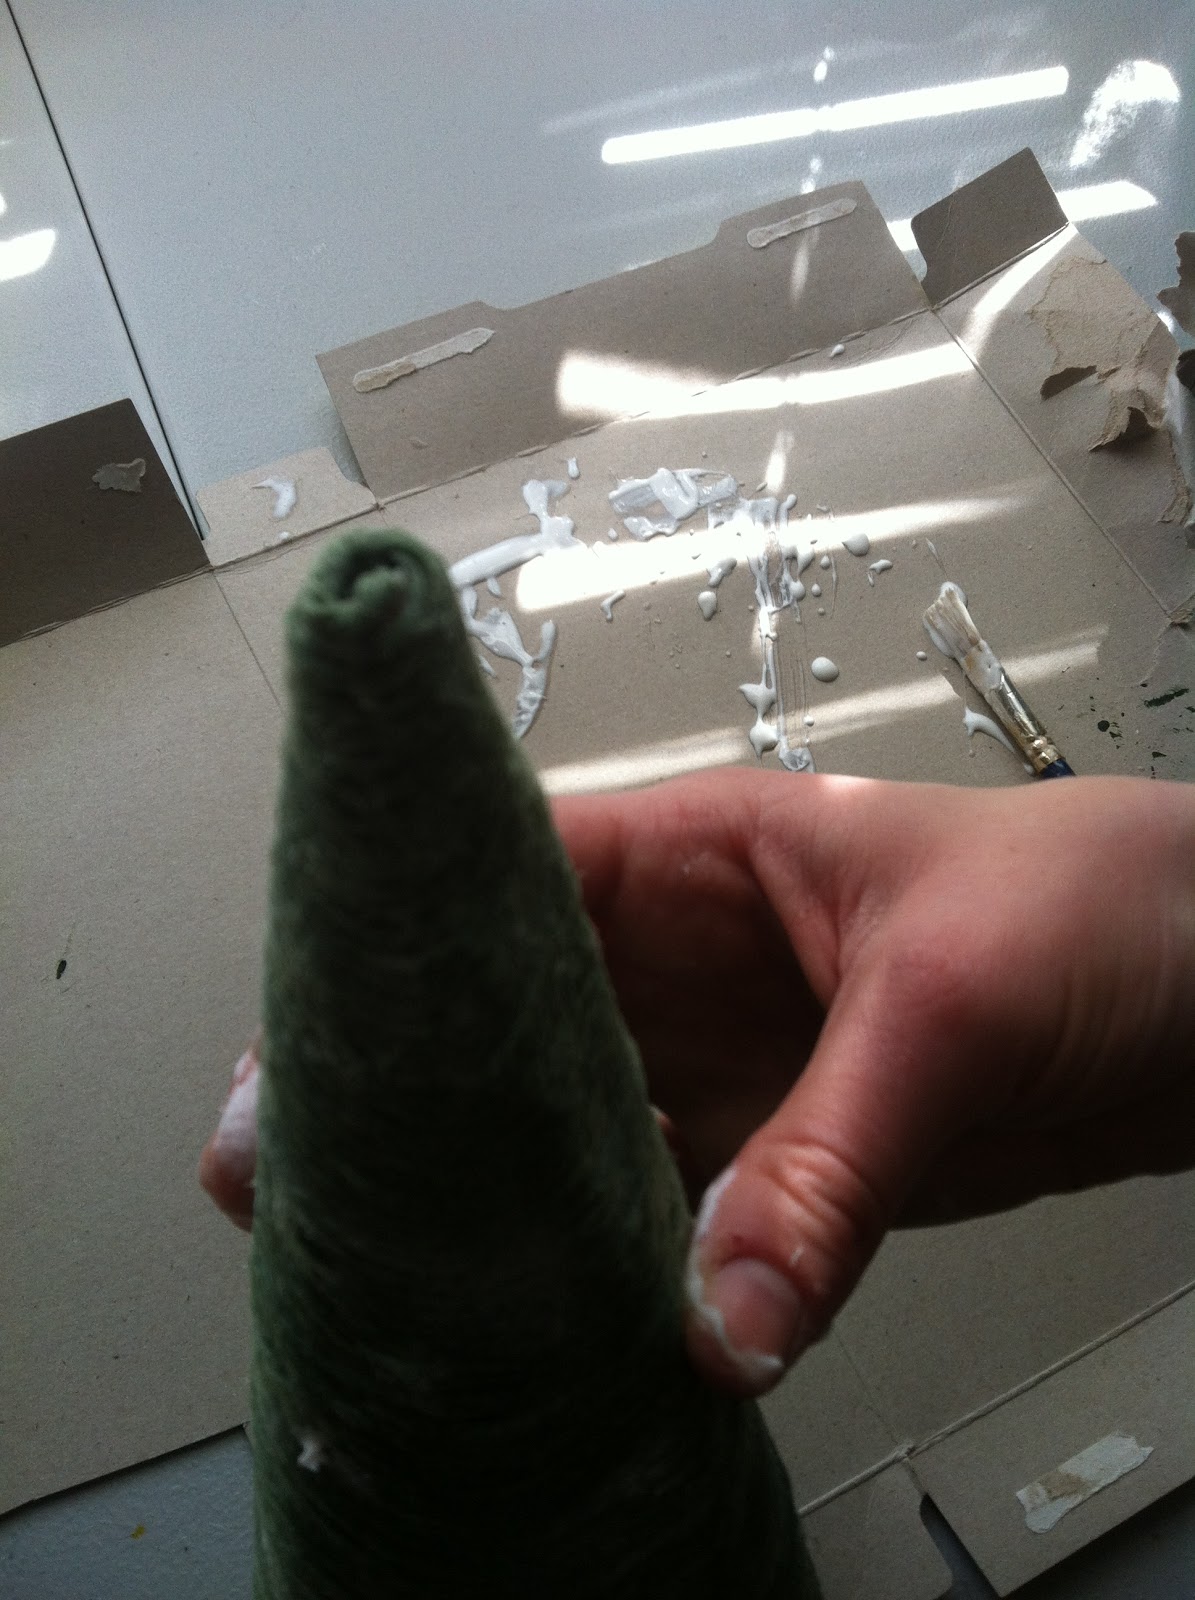
6. Spread some modpodge around the base of the cone and start wrapping your spring around, pressing it into the modpodge and making sure that the edges of the string are touching with each layer you add. Keep adding modpodge and string until the entire cone has been wrapped.

7. Cut the string from the ball/spool about 4" from where it ends on the cone to leave a tail. Put the tail through the little opening at the top.

8. You should see the tail inside of the cone, hanging like this.


9. Ta-da! Let the tree dry for a few hours and go peel the 8 extra layers of glue "skin" off of your fingers. 


I added a snowflake button to the top of mine to hide the lumpy top. Cone tree found a nice home next to my sticks in a vase with fake cranberries, our snowman candle from Holland House Candles and a snowman figurine my mom donated to the cause a few years ago. PS: whoever designed the dry bar in my house obviously was male because it's SO awkward and impossible to decorate nicely.


Thursday, June 7, 2012

Reusable "Paper" Towel

Between having a baby, dog and husband, I use lots of paper towel to clean up messes. To be fair, I'm probably the worst offender with the kitchen mess making, especially when the blender is involved in the project. When I realized that we're literally using a roll a week, which is unbelievably wasteful, I decided that it was time to do something about it. Pinterest yet again delivered with ideas for reusable paper towel, modified to meet my needs :) Since my needs usually call for a half-sheet of paper towel, I made mine in half-sheet size. I finished this project early this week and started using the cloth towels, and let me tell you, they ROCK. One sheet of Bounty doesn't have anything on terry cloth! I also made a wet bag to hang on my stove and collect the dirty towels until it's time to wash them.


Reusable Paper Towel
Materials:
- 1 1/2 yards of terry cloth material
- 1 1/2 yards of cotton material or flannel
- matching thread
- sew-on velcro
- scissors
- sewing machine

Instructions:
1. Wash and dry both pieces of fabric.

2. Cut 24 6" by 11" rectangles out of both types of fabric. Set the extra fabric aside for the wet bag. If you want full-sheet sized towels, make your pieces 12" by 11" and only cut 12 of each fabric.

3. Match the rectangles up into pairs, one terry, one cotton. Place the printed side of the cotton face-up, pin together around the edges, then sew all of the way around the rectangles, leaving about a 1/8 allowance between the stitch and edge of the fabric.

4. Cut the velcro into 1" pieces. Lay the rectangle flat, cotton side up, short edges as top and bottom, and place two pieces of the same type of  velcro in the corners on the left side, one on the top corner, one on the bottom. Sew these on. Flip the towel over, place the opposite pieces of velcro in the corners on the left side of the terry cloth, sew on.

5. To make the wet bag, cut two 12" x 14" pieces of each type of fabric. Place one piece of terry cloth down, then a piece of cotton - print up on top of it. Set the other piece of cotton - face down onto the stack, then the other piece of terry cloth. Sew around 3 of the sides, then turn it inside out. Cut 4 16" x 3/4" strips of the cotton fabric. Roll each piece over onto itself 3 times, then sew it together. These will be the ties. Pin two ties into each side of the top of the bag. Sew the cotton to the terry around the top, securing the ties into the seem well.


6. Using an empty cardboard paper towel roll, mark where the velcro from the terry cloth side of the towels is. Glue the opposite type of velcro around the tube at both of the marks.

7. I had to rewash my towels at this point, since the terry cloth sheds a lot while cutting and sewing. If yours are ok, then you can attach your towels into a roll! Woohoo!


Tuesday, June 5, 2012

Menu Board

In my meal planning frenzy, I've been printing off a weekly menu to hang on my fridge and keep me on track. Printing a new one every week seems so wasteful, even though it get recycled. Luckily, I had an old picture frame hanging around the house to repurpose into a menu board! Did you know that you can write on glass with a wipe-off marker and it comes right off?!


Menu Board
Materials:
- Picture frame
- Staple gun
- Ribbon
- Fabric Glue
- Days of the Week printout

Print Out:
1. Open Microsoft Word.
2. Draw a table 8" wide and 10" high with 7 rows, 1 column.
3. Make each row 1.3" high.
4. Type on day of the week on each line. I started with Sunday since that's how I do my menu.
5. Choose a great font, make it size 72 and print that bad boy out.
6. Cut the paper down to 8" x 10" size - cut around the outside of the table.

Board:
1. Measure out 3 feet of ribbon. Tie a bow directly in the middle, insert fabric glue into the knot and pull the knot part tight.
2. Place the frame on the floor/table, front facing down.
3. Place the ribbon ends on the corners of the back of the frame, fold each end over onto itself once or twice, and staple into place.
4. Remove back panel from frame, set the print out face down on the glass, then replace the back panel.


5. Find a convenient spot to hang the menu board in your kitchen and write out your week's dinner menu!


This is a QUICK project, literally took me all of 5 minutes! I'm sure hubby will love the pink ribbon too! :)

Thursday, May 3, 2012

Fabric Bin

I was doing laundry the other day and managed to knock one of the many random things that have found their way onto the top of my washer behind it. Our laundry room is the walkway into the garage, so the washer has become home to everything and anything that would go from garage to house and back. After spending 5 minutes reaching behind the washer to retrieve it and being terrified of what kind of pest was going to jump out at me (unfortunately we have more than just dust bunnies lurking in dark places), I decided that this scenario didn't need to be repeated. Luckily, I had a shoe box and a fat quarter of fabric hanging around to make a fabric bin to wrangle all of the random stuff that finds its way onto the washer. This literally took me five minutes to make and is a great organizational tool!

DIY Fabric Bin
Materials:
- shoe box
- hot glue
- fabric (I used a fat quarter because it was the right size for my box)
- scissors, if you need to cut the fabric


Directions:
1. Remove the lid from the shoe box. If lid is attached like mine was, cut the lid and any other flaps off.


2. Lay the fabric out, printed side facing down. Set the box in the middle of it and test folding the fabric up the sides to make sure there will be enough and that the box is positioned correctly. 


3. Spread hot glue on the bottom of the box and carefully smooth the fabric over it. Spread glue on one side of the box, then  pull the fabric up over it, smoothing out any wrinkles. Repeat for all four sides. There should be some overlap to go into the box, glue that down inside of the box, one side at a time.


Ta-da!