Tuesday, December 11, 2012

Cone Christmas Tree Made From Recycled Cardboard

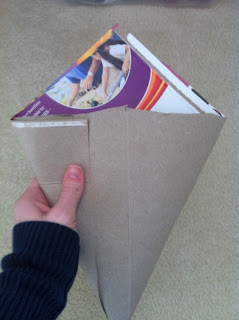
If any of you use Pinterest, you've probably seen the super adorable cone Christmas trees all over it. I saw some last year and thought they were neat, but after looking at the cardboard cones at Hobby Lobby and seeing that they're kind of expensive for this project, I decided that if I wanted to make a cone tree, I better figure out how to make my own cone to use. Luckily I had some practice making cones (I'll post the project later) for baby bear's first birthday party hats. Being an avid recycler and tree-hugger, I have a bunch of boxboard hanging around in "limbo," waiting to be taken to the recycling center. Bam. Free cone. Here's the scoop:

What you'll need:
- Cardboard (I used a cereal box and got a 12" tree, so bigger box if you want a larger tree, smaller box for a smaller tree)
- Yarn/twine/something in the string family
- Modpodge
- Scissors
- Elmer's glue
- Paper clip/Binder clip

How to:
1. Cut open your box so it lays completely flat.

2. Cut off all of the little tab edges so you have a clean rectangle.


3. Fold two of the corners toward each other, keeping the printed side of the box to the inside and roll the rectangle into a cone. 


4. Unless you're an origami genius, you probably have a tail on the bottom of your cone like I ended up with. Cut that tail off and cut around the base of the cone so that you have an even base. 


5. Using your binder clip or heavy duty paper clip, secure the cone. Spread some glue into the seam, covering the whole height of the cone, and let it dry. 


6. Spread some modpodge around the base of the cone and start wrapping your spring around, pressing it into the modpodge and making sure that the edges of the string are touching with each layer you add. Keep adding modpodge and string until the entire cone has been wrapped.

7. Cut the string from the ball/spool about 4" from where it ends on the cone to leave a tail. Put the tail through the little opening at the top.

8. You should see the tail inside of the cone, hanging like this.


9. Ta-da! Let the tree dry for a few hours and go peel the 8 extra layers of glue "skin" off of your fingers. 


I added a snowflake button to the top of mine to hide the lumpy top. Cone tree found a nice home next to my sticks in a vase with fake cranberries, our snowman candle from Holland House Candles and a snowman figurine my mom donated to the cause a few years ago. PS: whoever designed the dry bar in my house obviously was male because it's SO awkward and impossible to decorate nicely.


Thursday, November 29, 2012

Busy Book Now on Etsy!

For those of you who enjoyed my quiet book posts, check out my brand new Etsy shop where I am selling a finished quiet book! The book is Marine Corps-themed and would make a great Christmas gift!

Here's the listing:

Being a Marine wife myself and having a young child who it is very hard to explain Daddy's job to, I decided to make a busy book for little hands that would help show more about what the Marine Corps is. My hope is that these books can serve as comfort to some kiddos while their parent is deployed, or just help them to better understand what it means that dad or mom is a Marine.

The book measures 8" x 8.5" and has a marpat desert camo fabric cover with velcro closure.

 Pages 1 and 2 have a helicopter that moves up and down and a bull dog with a mouth that opens to reveal a pull-out bone.
 Pages 5 and 6 have a Marine dress-up and a combat boot lace-up with real 550 cord.

Check out my Etsy listing to see the whole book!


Wednesday, November 28, 2012

Joy Sign


Lately I've been hearing the word "joy" a lot. I'm not really sure why, but I've always just associated joy with Christmas. Joy is something that we should be experiencing on a daily basis, though. Yes, we should be filled with joy around Christmas as we celebrate the birth of Jesus, but shouldn't we also be filled with joy each day as we celebrate all of the simple gifts God has blessed us with? Just waking up in the morning should fill us with joy, although I know my mornings generally do not reflect that my heart is filled with joy. I wanted to make a sign for my Christmas mantle and I thought that seeing "JOY" every day might remind me to stop letting earthly things get in the way of my joy. A little JOY for my home...


What you'll need:
- 3-D wooden letters (Hobby Lobby)
- Paint
- Mod Podge (or a 50/50 mix of Elmer's and water)
- Paint Brush
- Scrapbook Paper
- Pencil
- Scissors

How to:
1. Paint the edges of the letters, let dry. I did two coats on mine to get a rich color.


2. Lay the letter face down on the wrong side of a piece of scrapbook paper. Trace around the inner-most part of the letter. (I used 3-D letters from Hobby Lobby so mine had a carved edge and a smaller "face" for the front of the letter than the whole piece itself.)


3. Cut out the letter from the paper.
4. Slather some decoupage on back of the paper then carefully lay it onto the face of the letter. Slather the top of the paper with decoupage too.


Tuesday, November 27, 2012

Pinecone Christmas Trees

This might be the easiest project ever. It would be great to do with kids, too. Take them on a pinecone hunt to find the supplies!

What you'll need:
- Pinecones (flat bottomed pinecones work best for this project since they will need to stand up on their own)
- Cardboard (boxboard from a cereal box works great for this)
- Marker (I used a metallic marker)
- Glue (Elmer's works fine)

How to:
1. Draw a star on the non-printed side of your cardboard. Fold the cardboard in half and cut out the star so that you cut two identical stars at once. Glue the printed sides of the cardboard together and let dry.
2. Color both sides of the star with the marker, making sure to color the edges too. 
3. Place star on top of pinecone, glue it on or just let it sit free. 

I added fake cranberries to one of my "trees," so things like sequins, glitter, gemstones, etc. would make fun personalized touches! 


A Very Homemade Christmas

It's been forever since I've updated and I apologize for my hiatus. I've been working on starting my own crafting venture and dealing with lots of other things that we'll just call "life." With Christmas quickly approaching, I've begun to decorate my house and came to the realization that while my existing stash of decor worked perfect for our smaller former residence, I have lots more space to fill this year. For most people, this would have a simple solution: buy more crap. I'm not into buying more useless stuff that I'll just have to weed out when we move again in another few years, so I'm opting for making everything I add to my holiday display. I'm trying to make everything from things I've reused, pinecones/sticks I can find in my yard, and stuff that I'll be ok with leaving behind in a few years. After all, Christmas isn't about "stuff," but about celebrating the birth of our Savior. I'll be posting projects in the next few days as I complete them and also posting my not-so-secret product that will be available on Etsy in just a few days!

Tuesday, August 7, 2012

Felt Flowers

As promised a few months ago (yes, I know, but my life has been anything but tame lately), here's the tutorial for making felt flowers. 

Felt Flowers
Materials:
- Felt
- Scissors
- Hot glue

1. Cut out 4 of the same shaped flowers, about 1" diameter each. I apologize that I don't have a template to share, but I do most of my shapes freehand.


2. Place a dot of glue into the center of a flower and fold it in half. Do this for all 4 flowers.


3. Lay one flower with the flat side pointing down, then place a dot of glue on the flat edge, in the center. Lay another flower down, flat side facing to the left, flowered part facing right and overlapping with the first flower. Place another dot of glue on top of where the flowers overlap, then place the third flower over top of the glue, with the flat side facing up, flower side down. Place another dot of glue in the center and place the last flower on top of the third flower. Tuck the top end underneath of the first flower. It should look like a closed box lid.
(Terrible pic, I'll take a better one next time I make some!)

4. Fluff out the petals from the center after the glue dries. If you're adding a hair clip or sewing the flower onto a headband, now is the time to do it!


The possibilities for these super easy flowers are endless! I grouped some together to make a patriotic headband for baby bear!


Monday, July 9, 2012

Gathered Flower Headband

My little Baby Bear is almost a year old, but still doesn't have very much hair. She recently got a new wardrobe (seriously, this girl literally outgrew everything in her closet), so obviously she needed some new hair accessories to match her summery attire. To be fair, I may or may not have been bored this afternoon as well. This is my new flower type and probably my favorite so far. Hope you enjoy it too!


Gathered Flower Headband
Materials:
- Strip of fabric, 2" by 15" (or wider than 2" if you want to make a bigger flower)
- Needle and thread
- Elastic cut to about 1/2" smaller than head circumference
- Button

1. Run a stitch down one side of the fabric.

2. When you reach the end, pull the thread to "cinch" the fabric up. 
3. Twist the cinched fabric to make a flower shape, secure with needle and thread.
4. Sew button into the middle of the fabric.
5. Sew the ends of the elastic together, overlapping about 1/4" then sew the elastic onto the back of the flower. 


Tuesday, June 19, 2012

Salmon Worth Salivating Over

Ever try to start dinner and realize that one of your ingredients isn't any good? Welcome to my evening. I'm not a very good cook, so improvising is a little bit scary for me (and my poor hubs who has to eat it), but this  concoction actually turned out to be pretty dang tasty! Paired with baked Parmesan, mushroom and artichoke tomatoes, this salmon made for a healthy, yummy dinner. If you try this out, please let me know if you liked it!

Sweet and Savory Salmon
2 salmon fillets, with skin
1/4 cup lemon juice
1 tbsp honey
1 tsp minced garlic
1/4 tsp onion powder
1/4 tsp Old Bay
1 1/2 tbsp olive oil
1 tsp dried cilantro (probably about 1 tbsp of fresh)

1. Preheat oven to 400 degrees. Place salmon on greased baking sheet, skin down. Poke each fillet all over with a fork multiple times.
2. In a small bowl, combine lemon juice, honey, garlic, onion powder, Old Bay, olive oil, and cilantro. Stir well until oil, lemon juice and honey are well combined.
3. Brush all of the sauce over the salmon.
4. Bake for 20 minutes for well done salmon.


DIY Extender Duster

I was mighty proud of myself for coming up with this contraption today to reach my vaulted ceilings for dusting. I'm sure many of you have already done this and are going to say "well duh!!" (Mom). I had been using my Dyson digital slim to vacuum the cobwebby ceiling corners, but after doing a few rooms and holding the vacuum up into the air for a few minutes at a time, my arms were really feeling it. Then it dawned on me, we have a lightweight yard stick and an already dirty Swiffer duster, so I could just rubber-band the duster onto the top of the yard stick... Don't judge me for using a disposable duster. The hubs and I both have HORRIBLE allergies, so trapping the dust and getting it out of the house is a must for us. It's the one and only not-so-eco-friendly cleaning thing I use. Anyways, here's a picture of the contraption:


I literally just folded a Swiffer duster pad in half, slid it onto the top of a yard stick, and rubber-banded it in place. This would also work with a broom handle and sock or any sort of cloth. Moral of the story: save yourself the $20 on the Swiffer Extender contraption thingy or whatever else they try to sell you to reach up into high places for dusting and just use what you have at your house. The environment will love you for it :) 

Friday, June 15, 2012

DIY Mini Keg Planter Follow Up

I posted our mini keg planter project a while ago (original post), but since it was winter, I didn't have a picture of one with flowers in it! We acquired a 2012 Oberon mini recently thank you to some amazing friends and the hubs made me another planter out of it last weekend. We lined the bottom of the planter with pea gravel before we added dirt to allow for better drainage. I found some adorable pink impatients at the blueberry farm last weekend, so we now have some pretty flowers on our patio! I was really excited to find flowers that like shade, since our patio is covered.

Thursday, June 7, 2012

Reusable "Paper" Towel

Between having a baby, dog and husband, I use lots of paper towel to clean up messes. To be fair, I'm probably the worst offender with the kitchen mess making, especially when the blender is involved in the project. When I realized that we're literally using a roll a week, which is unbelievably wasteful, I decided that it was time to do something about it. Pinterest yet again delivered with ideas for reusable paper towel, modified to meet my needs :) Since my needs usually call for a half-sheet of paper towel, I made mine in half-sheet size. I finished this project early this week and started using the cloth towels, and let me tell you, they ROCK. One sheet of Bounty doesn't have anything on terry cloth! I also made a wet bag to hang on my stove and collect the dirty towels until it's time to wash them.


Reusable Paper Towel
Materials:
- 1 1/2 yards of terry cloth material
- 1 1/2 yards of cotton material or flannel
- matching thread
- sew-on velcro
- scissors
- sewing machine

Instructions:
1. Wash and dry both pieces of fabric.

2. Cut 24 6" by 11" rectangles out of both types of fabric. Set the extra fabric aside for the wet bag. If you want full-sheet sized towels, make your pieces 12" by 11" and only cut 12 of each fabric.

3. Match the rectangles up into pairs, one terry, one cotton. Place the printed side of the cotton face-up, pin together around the edges, then sew all of the way around the rectangles, leaving about a 1/8 allowance between the stitch and edge of the fabric.

4. Cut the velcro into 1" pieces. Lay the rectangle flat, cotton side up, short edges as top and bottom, and place two pieces of the same type of  velcro in the corners on the left side, one on the top corner, one on the bottom. Sew these on. Flip the towel over, place the opposite pieces of velcro in the corners on the left side of the terry cloth, sew on.

5. To make the wet bag, cut two 12" x 14" pieces of each type of fabric. Place one piece of terry cloth down, then a piece of cotton - print up on top of it. Set the other piece of cotton - face down onto the stack, then the other piece of terry cloth. Sew around 3 of the sides, then turn it inside out. Cut 4 16" x 3/4" strips of the cotton fabric. Roll each piece over onto itself 3 times, then sew it together. These will be the ties. Pin two ties into each side of the top of the bag. Sew the cotton to the terry around the top, securing the ties into the seem well.


6. Using an empty cardboard paper towel roll, mark where the velcro from the terry cloth side of the towels is. Glue the opposite type of velcro around the tube at both of the marks.

7. I had to rewash my towels at this point, since the terry cloth sheds a lot while cutting and sewing. If yours are ok, then you can attach your towels into a roll! Woohoo!


Tuesday, June 5, 2012

Menu Board

In my meal planning frenzy, I've been printing off a weekly menu to hang on my fridge and keep me on track. Printing a new one every week seems so wasteful, even though it get recycled. Luckily, I had an old picture frame hanging around the house to repurpose into a menu board! Did you know that you can write on glass with a wipe-off marker and it comes right off?!


Menu Board
Materials:
- Picture frame
- Staple gun
- Ribbon
- Fabric Glue
- Days of the Week printout

Print Out:
1. Open Microsoft Word.
2. Draw a table 8" wide and 10" high with 7 rows, 1 column.
3. Make each row 1.3" high.
4. Type on day of the week on each line. I started with Sunday since that's how I do my menu.
5. Choose a great font, make it size 72 and print that bad boy out.
6. Cut the paper down to 8" x 10" size - cut around the outside of the table.

Board:
1. Measure out 3 feet of ribbon. Tie a bow directly in the middle, insert fabric glue into the knot and pull the knot part tight.
2. Place the frame on the floor/table, front facing down.
3. Place the ribbon ends on the corners of the back of the frame, fold each end over onto itself once or twice, and staple into place.
4. Remove back panel from frame, set the print out face down on the glass, then replace the back panel.


5. Find a convenient spot to hang the menu board in your kitchen and write out your week's dinner menu!


This is a QUICK project, literally took me all of 5 minutes! I'm sure hubby will love the pink ribbon too! :)

Saturday, June 2, 2012

Eating "Fresh"

This post isn't about a project, but is about my opinion on food. Stop reading if you don't want to hear my opinion, otherwise, thanks for listening :)

 Lately, I've gotten into a ton of discussions with people about what kind of food they eat and how either processed food is the devil or the inexpensive solution to feeding a growing family. It doesn't matter which side of the fence you're on regarding this issue, but here's the bottom line: there's food revolution going on in our country. People need to educate themselves with factual information and stop blindly following everything that they see on the news or the internet. Yes, fresh food is definitely healthier for you. Is organic necessarily better? That's your personal opinion, in my opinion. I don't think that we eat very much processed food at my house. An outsider would probably come in, look at my pantry, and beg to differ. True, there are lots of boxed and canned items in my pantry, but after looking closer, you'd see that it's all raw ingredients. Sugar, flour, rice, pasta, etc. Of course there are things like cereal and tortilla chips, but I don't feed my family "convenience foods" like frozen pizza or TV dinners. We literally make everything from scratch. Breakfast muffins? Scratch. Granola? Scratch. Spanish rice? Scratch. Every single lunch and dinner, baby food, and dessert - from scratch. Sure, the ingredients were processed, but compare the little bit the raw ingredients are processed to how much a boxed mix of brownies is. It's a no-brainer.
I've also been hearing that vegetables are expensive. I will agree with this to some extent, but the fact is, when you buy things in season (ie, asparagus in the spring time or apples in the fall), that's when the price is lowest. Eating produce when it is in season is sustainable and cost effective. Don't believe me? We just got 20 lbs of blueberries for $2.50 a pound because they are in season. Compare that to a pint for $3.99 in January. Vegetables are an investment, but they stretch mush further because they FILL YOU UP. You'd be amazed by how far a few single veggies can go. $25 worth of produce will feed us for a week, eating veggies as a side dish or main dish for every meal. If that isn't bang for your buck, I don't know what is.

Moral of the story, if you want to feed your family less processed food, start with buying more produce and more raw ingredients. Making things from scratch is time consuming, but I'm 100% convinced that it's saved us majorly on our grocery bill.

Monday, May 14, 2012

Homemade Composter

The hubs came up with this project idea while we were planning our garden for this summer. While our compost won't be ready to use this season, it will be a nutritious delight for our veggies next summer! This is an easy homemade composter made from some 2x4, a 5 gallon bucket with lid, L brackets, rollerblade wheels, and two thin poles. He constructed a rectangular base out of the 2x4s and drilled a few drainage holes in the bucket. Then he screwed L brackets into the inside of the bucket in 3 rows on diagonals. He put wheels on the poles with nuts to hold them in place and set them on top of the base. The bucket is placed on it's side and sealed with the lid. We give it a spin to stir it up every few days. There are a TON of resources for composting available through your local county extension. You need to have the right mix of green and brown materials for your compost to not smell terrible and be nutrient rich. Composting is a great way to keep some food waste out of the landfill and to boost your garden soil for free!


Coffee Cup Coozie

I saw this project idea on Pinterest and couldn't resist making my own version of it. I always recycle my coffee cup coozies after my coffeeStarbuck's beverage has been consumed, but having a reusable one, made from materials that I already have, seemed like a no-brainer. Reducing and reusing, while still feeding my coffee habit. These work great for hot and cold bevs! Store it in your car and you'll always be prepared for a caffeine fix.


Reusable Coffee Coozie
Materials:
- hair elastic
- large button
- cotton fabric (5" x 10")
- flannel fabric (5" x 10")
- pellon (4" x 9")
- marker
- cardboard coozie (to trace)
- iron
- scissors
- needle and thread or sewing machine


1. Lay cotton and flannel fabric out, printed side down. Break the seam on the cardboard coozie carefully, making sure not to rip it. Trace the cardboard coozie onto the fabric, adding about 1/4 inch extra around all sides. Cut it out. 


2. Trace the cardboard coozie onto the pellon, then cut it out. 


3. Lay the flannel down, place the pellon on top of it, then the cotton fabric on top of the pellon. Run the iron over the top until the pellon has fused to the fabric, then flip it over carefully and iron the flannel side as well. 


4. Zig-zag stitch hair elastic together in the center so that each end is in a loop. cup one of the loops off. Place the stitched end in between the fabric on one of the short sides so it is hidden, but the loop in hanging out. 


5. Fold the edges of the cotton and flannel in so that the rough edges are hidden. Sew them together all of the way around, sewing over the side with the elastic loop an extra time to secure it. 


6. Bend the coozie into a circle and overlap the edges by about 1/4-1/2 inch. Mark where the elastic reaches to without stretching with a sharpie. Sew the button on that dot. 


7. Enjoy a delish hot beverage from your favorite coffee shop with your new, stylish coozie.


Monday, May 7, 2012

Hydrangea Hair Bow

Now that we're well into spring, its warm enough for baby bear to wear her colorful spring and summer clothes. A new wardrobe calls for new hair bows!! I still have a TON of left over felt from the quiet book project so I decided that the new accessories would be felt flowers. I'll post another type of felt flower that I made later when I have an extra few minutes!


Felt Hydrangea Hair Clip
Materials:
- Felt, green and another color (one or more colors, depending on what color combination you want)
- Alligator clip
- needle and thread
- scissors
- flower stencil or artistic skill
- hot glue

1. Trace or freehand a four petal flower onto the felt. You will want about 12-14 individual flowers total. Cut the flowers out. 

2. Cut a circle out of the felt, about 3" in diameter. Also cut 2-3 one inch long leaves out of some green felt.

3. Sew each flower onto the circle by sewing a small x in the center of the flower. Some flowers will have to be squished and overlap a little bit, but that's ok. It will give the whole flower a final look. 

4. Sew the leaves onto the back of the flower, letting them peek out from behind the flowers as much or little as you like. 

5. Using hot glue, attach the alligator clip. Or, to make this a head band, sew the flower onto a stretchy head band, then glue a piece of felt onto the back to secure the flower to the head band. 

Thursday, May 3, 2012

Fabric Bin

I was doing laundry the other day and managed to knock one of the many random things that have found their way onto the top of my washer behind it. Our laundry room is the walkway into the garage, so the washer has become home to everything and anything that would go from garage to house and back. After spending 5 minutes reaching behind the washer to retrieve it and being terrified of what kind of pest was going to jump out at me (unfortunately we have more than just dust bunnies lurking in dark places), I decided that this scenario didn't need to be repeated. Luckily, I had a shoe box and a fat quarter of fabric hanging around to make a fabric bin to wrangle all of the random stuff that finds its way onto the washer. This literally took me five minutes to make and is a great organizational tool!

DIY Fabric Bin
Materials:
- shoe box
- hot glue
- fabric (I used a fat quarter because it was the right size for my box)
- scissors, if you need to cut the fabric


Directions:
1. Remove the lid from the shoe box. If lid is attached like mine was, cut the lid and any other flaps off.


2. Lay the fabric out, printed side facing down. Set the box in the middle of it and test folding the fabric up the sides to make sure there will be enough and that the box is positioned correctly. 


3. Spread hot glue on the bottom of the box and carefully smooth the fabric over it. Spread glue on one side of the box, then  pull the fabric up over it, smoothing out any wrinkles. Repeat for all four sides. There should be some overlap to go into the box, glue that down inside of the box, one side at a time.


Ta-da!


Sunday, April 29, 2012

T-Shirt Dog Toy

My dog is a little ball of energy and personality. Actually, I'm not even sure that he is a dog some days. He's destroyed pretty much all of his toys except for the ones that can be used to play fetch with (convenient for him, since he's a fetch robot!). I refuse to buy him more chew toys since he ruins them in the first 5 minutes of ownership, so I thought that I would give making him one from a t-shirt a try. He's been chewing on it for the last little while, so I'd call it a win.


Recycled T-shirt Dog Toy
Materials:
- Scissors
- Old t-shirt (you could use one, or a few for different colors)
- Knot tying abilities

Directions:
1. Cut the old t-shirt into 1 inch think strips. I cut mine across from side to side. You'll want to cut at least 8 strips, but more than 8 would definitely make the toy better!

2. Take one strip, make it into a loop and tie a knot in it, leaving the loop.

3. Feed another strip through the loop from step 2, then tie it in a knot to secure it. 

4. Feed the rest of the strips, one at a time, through the original loop, then tie a knot in each to secure it to the rest. It should kind of look like a ball where the knots are, with lots of tails hanging off. 

5. Tie a knot in each of the "tails." Dogs like to chew on knots, it's science. Well not really, but it will add interest to the toy. 

6. Give the toy to your dog and let it go to town chewing! 


This toy doesn't have an adorable face to rip off, but it serves it purpose. If your animal is anything like mine, this is a great alternative to a rope, which they eat the string out of and risk causing serious digestive track injuries. The best part, it's free. Who doesn't love a free dog toy?