Tuesday, January 31, 2012

M-I-C-K-E-Y M-O-U-S-E!!

My niece and nephew are Mickey and Minnie obsessed. Miss B is about to have a Minnie-themed 3rd birthday party! While the hubs and I were walking through Home Depot after church, I spied some Mickey Mouse paint samples and thought to myself, I could make some pretty awesome garland for the Mouseketeers with that! The paint samples are in the Behr brand section, in case you want to make this project. I grabbed one mouse in each color, which added up to a huge stack and some screwy looks from the person who was working in the paint department.


Mickey Mouse Garland:
1. Gather your supplies. 

Supplies: Hot glue gun, yard stick or ruler, Mickey paint samples, all-purpose twine.
2. Cut out all of the mouse heads VERY carefully from the paint samples. 
3. Arrange the mouse heads in whatever color pattern you want, creating a stack so you can just take one off the top and glue that bad boy on.
4. Space a few mouse heads out, color facing DOWN, about 2 inches apart (use yard stick for this). 
5. Measure out about 20 inches of twine from the spool to use as the end space for tying, hanging etc, and leave this as open space. Beginning after the 20" mark on your twine, you will press the twine into the hot glue.
6. Spread a little bit of hot glue onto the tops of the mouse ears, then carefully press the twine into the glue. Allow the glue to dry for a few seconds before moving the Mickey.
8. Measure 2 inches of twine from the first mouse head, the repeat step 6.
7. Repeat until you've used up all of the Mickey's or until you've reached desired length. Measure out another 20 inches of free space and cut the twine off of the spool.

The finished product! It looks pretty good hanging on Baby Bear's dresser!


You could use any kind of string/yarn/ribbon for this project, I just happened to have some twine on hand and I thought it looked cool.

Hopefully Little Man and Miss B will be doing the "Hot Dog" dance when they see their Mickey garland! Now my sister just needs to find some neutral territory to hang it in :) Oh, and yes, I will accept the "Most Awesomest Auntie Ever" award.

Monday, January 30, 2012

Quiet Book - Doggy/Buckle Page

I really felt like Baby Bear's quiet book was going to need a page with some sort of buckle or clip, but wasn't sure how to incorporate it. Thankfully, while doing some cleaning around the house, I came across Zeus' puppy collar and my needed inspiration struck. Baby Bear needed a page with Zeus on it, and his old collar to buckle. The little lady's going to have to learn how to put his collar on anyways, so it was perfect.

I started by making a rough sketch of the dog's head, redoing it until I thought I had his head shape and features pretty accurately portrayed. Then I cut the main head piece out of black felt and the white piece of his face out of white felt. The eyes, nose and ears were all pretty easy to make to scale and I even gave him a licking tongue, since his licker is always giving Baby Bear kisses. I cut two more pieces of black and white felt for his neck then laid it out on the page. I glued the pieces down, starting with the bottom/large layers first, and finishing with the smaller details like his eyes and nose. I then sewed around every edge to make sure that Zeus' face won't fall off with use. I then cut two slits in the page and put the collar through, sewing the slits like button holes to prevent tearing and sewing the collar on so she can't pull it out. After cutting a tennis ball and a milk bone out and attaching some velcro to the back of both pieces, I was done. This is my favorite page so far and I have a feeling that it will be Baby Bear's favorite too. She LOVES her doggy.

I think it looks like him!


Collar un-clipped. The bone and tennis ball are the perfect size to stick on his mouth!

Can't wait to start work on the next page! Either dolly dress up or spring flowers.. :)

Wednesday, January 25, 2012

Quiet Book - Shapes Puzzle

Woohoo! Another page finished! This page is a puzzle for shapes, made entirely from felt. There is a rectangle, square, star, heart, triangle, circle, and heart, each in a different color. I cut 3 copies of each shape, sewed one onto the page and the other two together for the puzzle piece. The pocket at the bottom is just a piece of felt with a zipper sewn in, then sewn onto the page. Pieces can be stored in the pocket when the book isn't in use. This page was very easy to do! 


Saturday, January 21, 2012

Tips for Sustainable Living - Vinegar

Lately, it seems like "green" is all the rage. The words "organic," "eco," and "natural" are popping up on products everywhere. Little do most consumers know, there are no standards or guidelines for content in a product to be able to be labeled with one of these deceivingly attractive words. Be a smart consumer and read the ingredients in these products, then decide for yourself if the product is really "natural," or if it is just being labeled as such because it has a few natural ingredients mixed in with the artificial. Some of the worst offenders in this new, misleading trend are cleaning products. We only use cleaning products which are derived from 100% plant based materials and are biodegradable, but I've quickly learned that household white vinegar can be used for the exact same tasks and is much more budget friendly. Vinegar is a totally natural, ecologically friendly and sustainable substance. It can be diluted with water to different concentrations for different uses. The pungent smell dissipates quickly, so don't let that keep you away from tapping this 99% antifungal, 95% antibacterial product.


Some ideas for using vinegar around your house in place of harsh chemicals:

  •  Equal parts vinegar and water mixed in a spray bottle make a great all-purpose cleaner. I use this in my bathroom on all surfaces, in the kitchen on the counters, to clean my linoleum floors, and even to sanitize Baby Bear's toys (which I rinse the crap out of afterwards to remove any remnants so she doesn't taste it).
  •  Hard water? Remove limescale with vinegar. Either soak the item in pure vinegar or pour some pure vinegar on the area, then scrub and rinse thoroughly with water. I did this on our shower doors and track to get the mildew and build up from the previous tenants off. I also use pure vinegar to descale my coffee maker, tea pot, and Baby Bear's bottle warmer. 
  • A dilution of 1 part vinegar, 2 parts water can also be used to wash dirty walls, baseboards, windows, and blinds. This worked great to clean our rental house (I have before and after pictures if anyone wants to see them), and it was a thrifty and safer alternative to chemical products like Mr. Clean.
  • Soaking paint brushes in vinegar will also remove any paint or sticky residue. I tend to forget to rinse them out after projects, so I refresh my brushes with an overnight vinegar soak.
The possibilities for vinegar are endless. The best part - it's safe to put into our sewer systems. Next time you're in the cleaning product aisle picking up a new bottle of 409 or Scrubbing Bubbles, think about if you could use white vinegar to do the same task instead. Priced at about $3 per gallon, you'll save yourself money while minimizing your ecological footprint on the earth. 

Wednesday, January 18, 2012

Quiet Book - Lacing/Tying Page

Baby Bear's quiet book has another page! Yay for federal holidays and the hubs being home :) I'm trying to create the pages in order of difficultly, and this one was super easy. This is her lacing/tying page, done in a girly way. The ballet shoe is made out of felt, glued on and then sewn on for extra durability. The ribbon is 1/4" gro-grain. I sewed the ends of the ribbon underneath the ballet shoe. Then I sewed four, 2" pieces of pink elastic into loops and attached them to the page in pairs. The elastic kind of looks like it might have been meant for underwear, but it will work for now. If I find something different, I might change it to make it look nicer. The tutu at the top is just there for extra decoration and texture on the page. I took a strip of pink tulle and pleated it, pinned it, and sewed it on. Since I don't have a sewing machine, everything was done by hand. The margin on the left side is left purposefully for binding at a later date.


I think this page turned out great and will add an extra girly touch to an educational activity :)

Tuesday, January 17, 2012

Quiet Book - Name Page

I'm so excited about this project. While I'm not really reusing any materials to make this one, I still think that it is share-worthy. I had previously posted my plans for Baby Bear's quiet book and I'm happy to say that I was able to get started on it this week. Since I'm spending almost every free moment I have studying for the GRE, I have only finished one page so far. Here it is:


This will be the inside cover page. The tops of the cupcakes have velcro on the backs and are interchangeable. The bottoms are sewed onto the felt of the page.The name pieces are also removable so Baby Bear can learn how to spell her name. I used felt for all of the pieces and the background. The removable pieces are doubled felt pieces with velcro sewn on the back. I put the opposite velcro piece on the background where the pieces are supposed to go. When I bind the book, I will put interfacing in between the felt pages to give it stability (as you can see, it's pretty floppy), and I'll sew the pages together using the one inch margin I'm leaving on each page. 

The cupcakes didn't turn out quite as I hoped, but since I didn't have a template or anything to go from, I think they'll work. 

Can't wait to get the GRE over with so I can work on more pages!!

Tuesday, January 10, 2012

Recycled Tights Headband

As anyone with a little girl knows, hair accessories are all the rage right now. I'm no exception to this fad and am guilty of not only buying but also making lots of pieces for my four month old daughter. Since she doesn't really have any hair, I have to attach any clips to a headband. There are really nice crocheted headbands at almost any craft store and on Etsy, but I've found that they are just too wide for a little melon like Baby Bear's. There are also thin elastic headbands at the store, but we've found that those squeeze the little head. A lady at church told me that she cuts headbands for her daughter from old pairs of tights, so I thought that maybe I would give it a try. Since I don't really have any old tights laying around, I had to buy a cheap pair at Target, but an old pair would definitely work great for this project. An old t-shirt or fleece scraps would probably work great too.

Materials:
- Tights
- Scissors
- Needle and thread
- Fabric glue (yet again, using the dreaded tacky glue..)

Instructions:
1. Measure the cabeza of whoever you are making this for and double it.
2. Cut three pieces of the tights length ways down the leg to the length of the doubled head circumference.


3. Stack the three pieces and match the ends up. Sew the ends together.


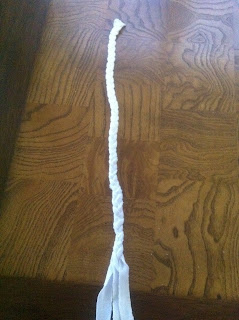
4. Spread the strands out to begin braiding. 

5. Braiding:
    Take the left strand (outside piece) and pull it over top of the center piece.

     Take the right piece (outside right) and pull it over the new center piece, so it is in between the center and left pieces.

     Take the new left piece and pull it over the new center piece. Then repeat with the right side and keep doing this. 

     Keep even tension on the strands as you continue the braid down to the end. Finish off the braid at about 1 inch before the bottom.

6. Grab your needle and thread again and sew the bottom of the braid closed to make sure that it doesn't fall out. There should still be about an inch of strand pieces left loose. 
7. Make the braid into a circle, matching up both ends of strands, restacking them together. Measure the headband against the head again, and hold it together where it will be just a tad smaller than the head so that it won't fall off. Sew the ends together at this point..

8. Cut a small rectangular piece of the tights, just enough to wrap around to cover the ends. 


9. Using some fabric glue, glue the edge of the rectangular piece to the seam, adding more glue and continuing to wrap the piece until it covers the whole seam and overlaps itself a little bit.

10. Trim off the excess and you're done! 

Finished product:

Best part is, the possibilities for this are endless! Dress it up with an accessory clip, make it in different colors, add more strands for a wider or woven look, etc. 

Baby Bear's will look great with her flowers, and won't be too wide for her head!


Friday, January 6, 2012

DIY Wedding Card Book

Since it feels like spring outside, even though it's clearly still winter, I've been getting bit by the cleaning bug. If the weather holds up, no room in our house will be spared from my organizational conquest. Right now I'm tackling the office, which is a big job. Somehow, in less than three months, it has become our catch-all room and has piles of crap everywhere. Most of it is wedding stuff that I either need to toss or find a home for. Our wedding cards were a part of this collection. As I contemplated filing them in my circular filing cabinet, I decided that I would probably regret doing so in the future, so for now at least, I wanted to hang on to them. I guess I could have just put them in a box or something simple, but I saw an idea for a wedding card book on this website and decided to make my own. Why not? The idea on the blog was pretty involved since it was created by a wedding crafting diva. Let's be real, I'm far from a professional crafter, so I simplified it majorly to make my version. Here's what I did:


Materials:
- Fabric scrap
- Two pieces of cardstock
- Wedding cards
- Ribbon left over from my wedding invitations
- Red yarn
- Hole punch
- Leaves made from cardstock left over from our place cards
- Gold Sharpie
- Tacky glue (Let me tell you all how much I HATE tacky glue, but it works so stinkin' great!)
- Quiescent Baby Bear (napping)

1. I sorted through the cards and found the largest and smallest cards that I wanted to include. I measured the largest card and cut two pieces of cardstock to be just a few millimeters larger than the card on each side. These will be front and back cover pieces.
2. Using a fabric scrap that coordinated well with our fall colored wedding, I cut it to the same size as the cardstock and used tacky glue to affix it to the piece that was to be the front cover.
3. For the back cover, I glued leftover leaves on the inside portion to decorate it, keeping a red leaf off to the side to attach over the ribbon closure last.
4. After the cover dried, I traced a "D" and an "E" onto leaves and glued them onto the fabric, and wrote our wedding date and "The Best is Yet To Come..." on another leaf and attached it to the lower portion of the cover. Our first dance was to Frank Sinatra's "The Best is Yet To Come" so it seemed appropriate.
5. Using the smallest card, I adjusted my three-hole punch so that only two holes would be punched in each card. You have to measure using the smallest card so that the holes will be close enough together to accommodate all of the different sizes. I then centered the holes on each card edge and punched them. Let me tell you, this was a task. Who's idea was it to make three-hole punches so thin, or to make wedding cards so thick?! I had to improvise holes on a few cards that wouldn't fit into the punch.
6. Using red yarn, I threaded the string from the back cover, all of the way through the stack of cards using the top holes, across the front cover and back through the bottom holes. I tied the yarn in a simple knot and cut off the ends. This will serve as a binding, so pull it tight, but not so tight that the cards can't turn since that would defeat the purpose of making the book...


7. I have a plethora of leftover ribbon from invites, decorations, etc. from our wedding, so I cut two pieces, one green and one brown and glued their overlapped middles to the back cover. Then I glued that extra red leaf over top of the ribbon for aesthetics and extra hold. Pull the ribbon carefully around the edges of the book and tie in a bow in the center of the cover.


Easy project that I was able to complete using materials that I had on hand. And now the hubs and I can save our wedding cards forever :) (I'm sure he'll be thrilled, haha)

And yes, I should be doing practice math problems for the GRE instead of making stuff, but everyone needs a study break, right?

Tuesday, January 3, 2012

Wedding Flowers in a Jar

After my wedding, I really wanted to dry my bouquet so I could put it in a vase and keep it for a while. My mom tried to dry it for me, but because of the type of flowers that were in it, it didn't exactly turn out to be a showpiece. My mom came up with the idea of putting the petals from the flowers in a vase so I could still keep them. Great idea, but I'm not really a flower petals kind of person, so I put the intact blooms in a jar instead. I carefully removed the roses from my bouquet and arranged them inside of a mason jar. I was only able to salvage the roses, since the daisies were very wilted and weren't very aesthetically pleasing. My mom also dried my bridesmaids' flowers, so I did the same thing with those, removing a few flowers from each bouquet to represent each of my beautiful friends.

Both jars - Bridesmaids' flowers and bride's flowers

Bridesmaids' flowers

My flowers
I don't have before pictures of the bouquets since they were so sad. You could probably add some ribbon to the outside of the jar for a more decorative look or add in other objects from the wedding to make it more of a wedding memory jar. I like it simple though, so mine are just that.

Sunday, January 1, 2012

A New-Old Nightstand

This week's project was to refurb the other old dresser we scored from friends to get it out of the garage. The "before" picture of it is in my "A Toy Box for Baby Bear" post. I decided to turn it into a night stand. We were going for a shabby chic/antique feel for it. Much like the toy box project, we dismantled it and sanded the laminate off of the dresser, them wiped it down to remove any sawdust. Then we spray painted the pieces with white paint. I found some decorative wooden cutouts at Lowe's for about $5 for a package of two and painted those a greyish blue. We drilled holes in the middle of the pieces for a screw hole to attach the glass knobs to the drawer front. I also found some fabric in almost the same pattern and shade of blue as the decorative pieces and used it to line the bottom of the drawers since they were pretty worn out. With a major assist from the hubs on this project, I now have a cool piece of girly furniture in our otherwise masculine bedroom!

Decorative pieces - pre-painting


Wood pieces painted and drilled
Fabric glued to drawer bottom
Decorative piece on drawer front with glass pull


Finished!!


Inside drawer
Another view


Turned out pretty great!