Tuesday, February 21, 2012

Quiet Book - Paper Doll page

Another page completed! Every little girl needs a dolly to dress up, and I'm sure that baby bear will enjoy dressing this one up during church, car rides, etc. The dolly has hair that can be braided and brushed. And of course, this book wouldn't be complete without at least one Sparty item, so there's a Michigan State sweatshirt for dolly :) This was a super easy page and I'm really happy with how it turned out!


The hangers are made from silver fabric that was left over from another project and the hair is made from yarn. Everything else is made out of felt. 

Each of the outfits has velcro on the back and the opposite piece of velcro on a hanger. The velcro sticks to the felt ok, but for storage, I wanted to make the pieces somewhere a little more secure to attach to. 

 Sparty outfit!

 Ballerina outfit

The empty page and removed clothes.

I'm getting so close to being done creating pages! Only two more to go!

Sunday, February 19, 2012

Quiet Book - Winter page

I'm SO excited to share this quiet book page! This is the winter page for the four seasons section. I really wanted to do something extra special for the winter page since I'm one of those rare, weird people that loves snow. Since we live in the south, baby bear isn't going to get to see snow like I did as a child. Knowing that she's missing out on this kills me. There's nothing more magical than waking up in the morning and finding out that you have a snow day and then looking outside to see snow as deep as your waist. My mom will tell you that my siblings and I loved to play in the snow and she had to coax us back inside most days before we froze. So, channeling my love for winter (and staring out at a sunny, 70 degree day in January...), I came up with a snow globe to be the winter page. I also added a few snowflake beads on long pieces of thread that can be moved up and down to "snow" on the scene, a brilliant idea from the hubs. Now that it's finished, I think this is going to be my favorite page :)

Materials: felt, snowflake buttons, seed beads, a fabric scrap, and a plastic page protector.


The "Winter" title was sewn on by hand , as are all of the other elements. I  was originally going to use vinyl for the "globe," but since we have an abundance of page protectors hanging around, I figured I'd give that a try before I bought vinyl. Thankfully it worked great. I even cut the "globe" to have two pieces, placing the seed bead "snow" and snowflake buttons in between the two pieces of plastic so that it would slide better than if they were placed directly onto the felt background. I shook it a lot to ensure that it works great :) 


A close up of the snow globe!!

Thursday, February 16, 2012

Quiet Book - Summer beach page

Another page completed! This is another installment of the four seasons pages, the summer scene. I was debating making this a picnic with watermelon and fireworks, but since we are now living quite close to the ocean, I figured a beach would be more appropriate. This page was easy but time consuming to make, as I had to sew every single object on by hand. There is a shovel, bucket and beach ball with velcro on the back of each piece to play with on the "beach." The sunshine also has velcro on the back. The seahorse and fish in the "ocean" slide along the ribbons to "swim." I was originally going to make a sea turtle, not a seahorse, but the baby bear has an orange seahorse stuffed animal from a recent trip to the aquarium that she is obsessed with, so I thought it was fitting. I left a 1" margin on the right side of the page for binding, so the ribbon ends won't be visible once the book is assembled. Everything but the ribbons in the "ocean" and the "S" in summer is made from felt.

Here's the finished page!

The removable pieces.
I used a stencil to make the bucket and shovel, and did the sunshine and beach ball by trial and error (mostly error).

Close up of the seahorse and fish. The twisted piece of ribbon at the bottom is for added texture because the baby bear loves to feel things and I don't really see that changing anytime soon.

The "empty" page - minus the pieces.

Close up of the title. The "S" is made from a fabric scrap and the rest of the word is sewn  on.
Only 4 pages left to make before I have to assemble the entire book! If you have any questions about how I've made this or any of the other pages, please leave a comment! I'll be happy to help as best as I can!

Monday, February 13, 2012

Quiet Book - Spring Flowers Page

Life has certainly been busy! Between the baby teething and having my husband's parents in town for a week, I haven't had any time to craft. Luckily, the baby went down for a very long and much needed nap so crafting time it was!!

This is the 5th page in the quiet book completed and is part of the four seasons page set I decided to do. The entire page is made from felt, minus the "S" in the title and the flower stems. The grass at the bottom is actually a pocket for the flowers to tuck into before they "grow." The stems are made from ribbon and sewed on page underneath the grass pocket. The flowers have snaps sewn and snap onto the page. The sun is removable, with velcro on the back. I didn't use a template for the flowers, just made them up as I went along, same with the grass and sun.

Spring flowers page

Flowers tucked into the grass pocket

The sun can go in the pocket too!


Tuesday, January 31, 2012

M-I-C-K-E-Y M-O-U-S-E!!

My niece and nephew are Mickey and Minnie obsessed. Miss B is about to have a Minnie-themed 3rd birthday party! While the hubs and I were walking through Home Depot after church, I spied some Mickey Mouse paint samples and thought to myself, I could make some pretty awesome garland for the Mouseketeers with that! The paint samples are in the Behr brand section, in case you want to make this project. I grabbed one mouse in each color, which added up to a huge stack and some screwy looks from the person who was working in the paint department.


Mickey Mouse Garland:
1. Gather your supplies. 

Supplies: Hot glue gun, yard stick or ruler, Mickey paint samples, all-purpose twine.
2. Cut out all of the mouse heads VERY carefully from the paint samples. 
3. Arrange the mouse heads in whatever color pattern you want, creating a stack so you can just take one off the top and glue that bad boy on.
4. Space a few mouse heads out, color facing DOWN, about 2 inches apart (use yard stick for this). 
5. Measure out about 20 inches of twine from the spool to use as the end space for tying, hanging etc, and leave this as open space. Beginning after the 20" mark on your twine, you will press the twine into the hot glue.
6. Spread a little bit of hot glue onto the tops of the mouse ears, then carefully press the twine into the glue. Allow the glue to dry for a few seconds before moving the Mickey.
8. Measure 2 inches of twine from the first mouse head, the repeat step 6.
7. Repeat until you've used up all of the Mickey's or until you've reached desired length. Measure out another 20 inches of free space and cut the twine off of the spool.

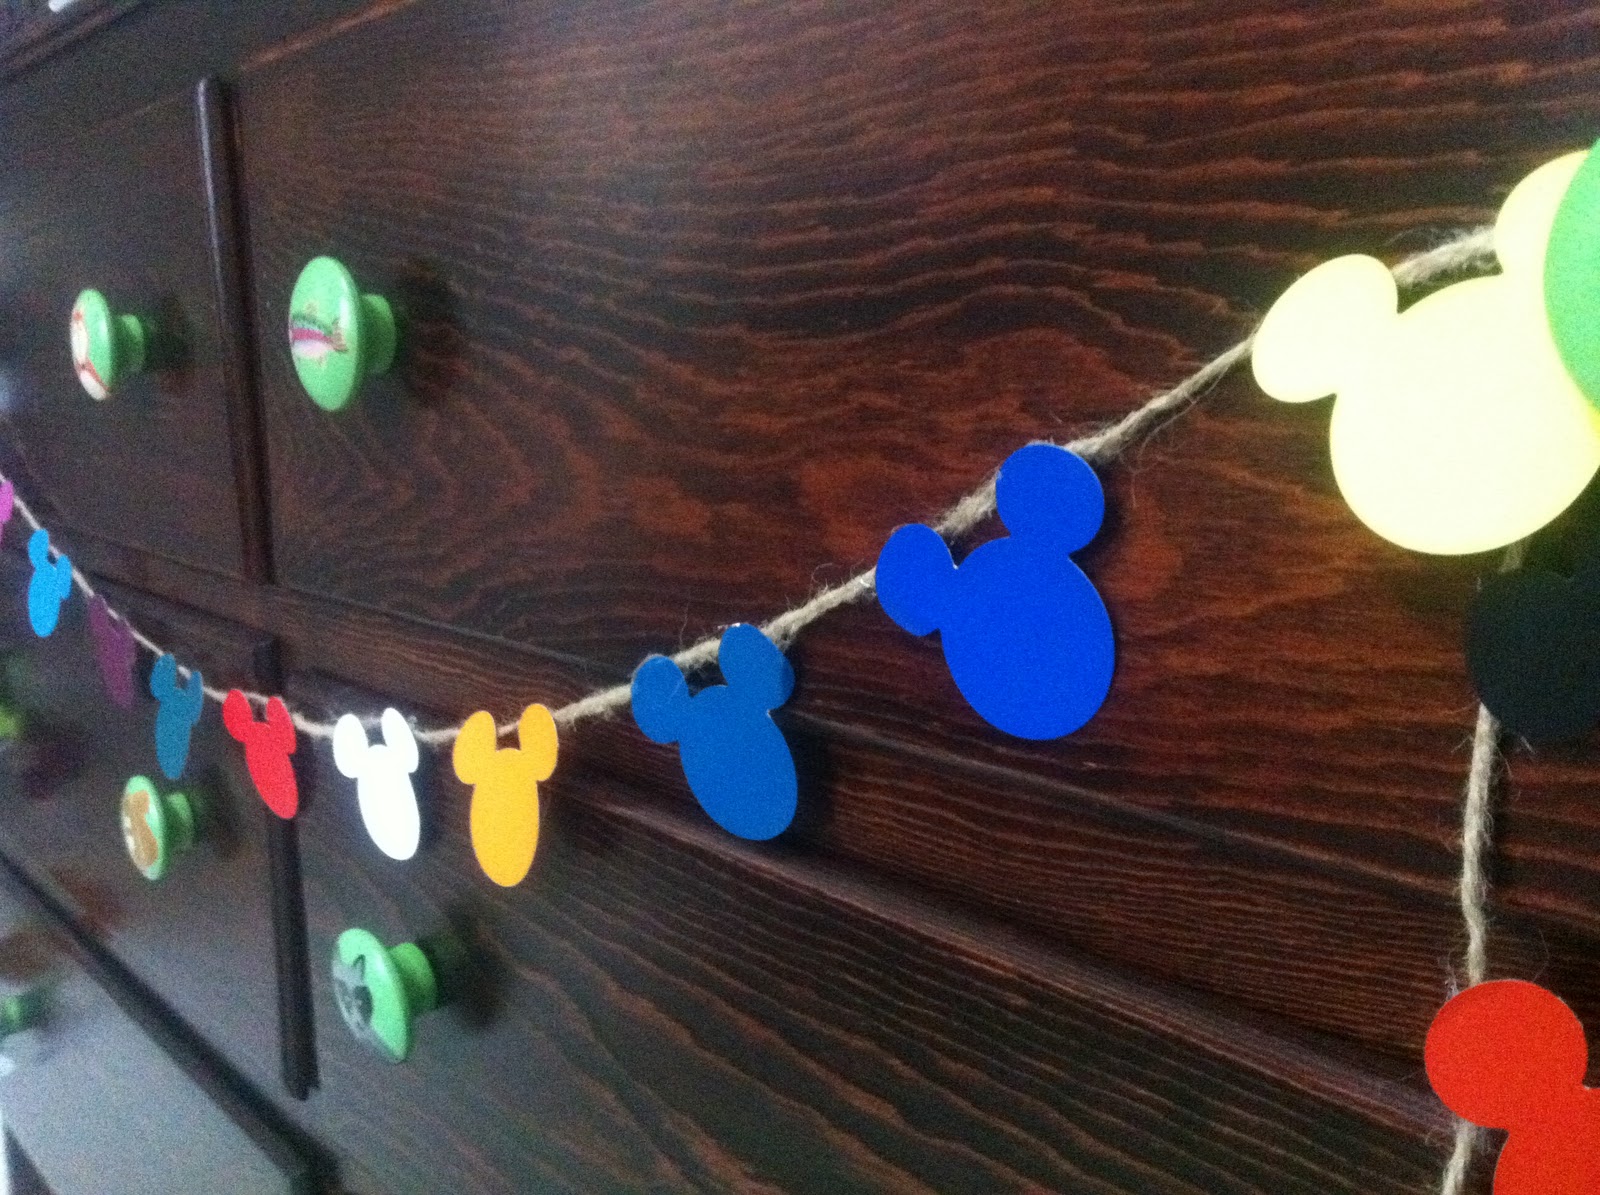
The finished product! It looks pretty good hanging on Baby Bear's dresser!


You could use any kind of string/yarn/ribbon for this project, I just happened to have some twine on hand and I thought it looked cool.

Hopefully Little Man and Miss B will be doing the "Hot Dog" dance when they see their Mickey garland! Now my sister just needs to find some neutral territory to hang it in :) Oh, and yes, I will accept the "Most Awesomest Auntie Ever" award.

Monday, January 30, 2012

Quiet Book - Doggy/Buckle Page

I really felt like Baby Bear's quiet book was going to need a page with some sort of buckle or clip, but wasn't sure how to incorporate it. Thankfully, while doing some cleaning around the house, I came across Zeus' puppy collar and my needed inspiration struck. Baby Bear needed a page with Zeus on it, and his old collar to buckle. The little lady's going to have to learn how to put his collar on anyways, so it was perfect.

I started by making a rough sketch of the dog's head, redoing it until I thought I had his head shape and features pretty accurately portrayed. Then I cut the main head piece out of black felt and the white piece of his face out of white felt. The eyes, nose and ears were all pretty easy to make to scale and I even gave him a licking tongue, since his licker is always giving Baby Bear kisses. I cut two more pieces of black and white felt for his neck then laid it out on the page. I glued the pieces down, starting with the bottom/large layers first, and finishing with the smaller details like his eyes and nose. I then sewed around every edge to make sure that Zeus' face won't fall off with use. I then cut two slits in the page and put the collar through, sewing the slits like button holes to prevent tearing and sewing the collar on so she can't pull it out. After cutting a tennis ball and a milk bone out and attaching some velcro to the back of both pieces, I was done. This is my favorite page so far and I have a feeling that it will be Baby Bear's favorite too. She LOVES her doggy.

I think it looks like him!


Collar un-clipped. The bone and tennis ball are the perfect size to stick on his mouth!

Can't wait to start work on the next page! Either dolly dress up or spring flowers.. :)

Wednesday, January 25, 2012

Quiet Book - Shapes Puzzle

Woohoo! Another page finished! This page is a puzzle for shapes, made entirely from felt. There is a rectangle, square, star, heart, triangle, circle, and heart, each in a different color. I cut 3 copies of each shape, sewed one onto the page and the other two together for the puzzle piece. The pocket at the bottom is just a piece of felt with a zipper sewn in, then sewn onto the page. Pieces can be stored in the pocket when the book isn't in use. This page was very easy to do!